Data Sources
Configuring data sources on your deployment
There are many ways to enter posts into your Ushahidi deployment other than from the deployment itself. This section shows you how to configure all the possible data source types. These include:-
NB: If you’re a user on ushahidi.com, the number of data source types available to you may be limited, based on the Ushahidi plan you are subscribed to. You may review these from our plans page. For open source/self hosted deployments, all data source types are available to you
To access the data sources configuration page,
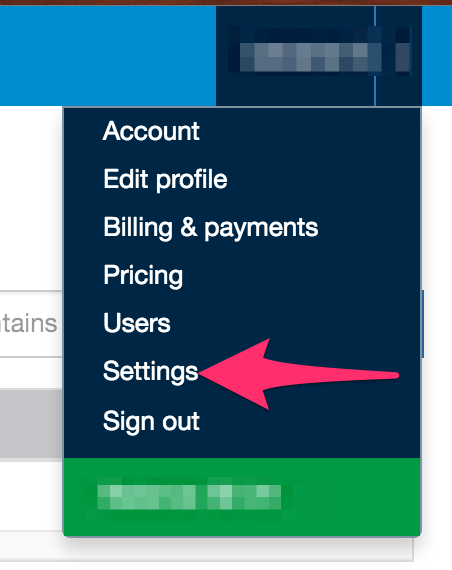
- On the left hand menu bar, click on Settings
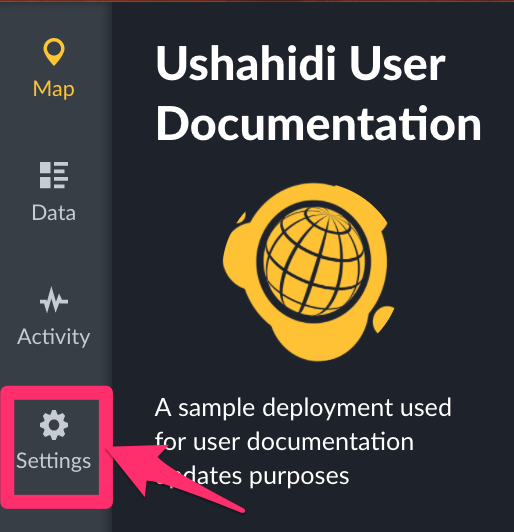
- Then, click on Data Sources.
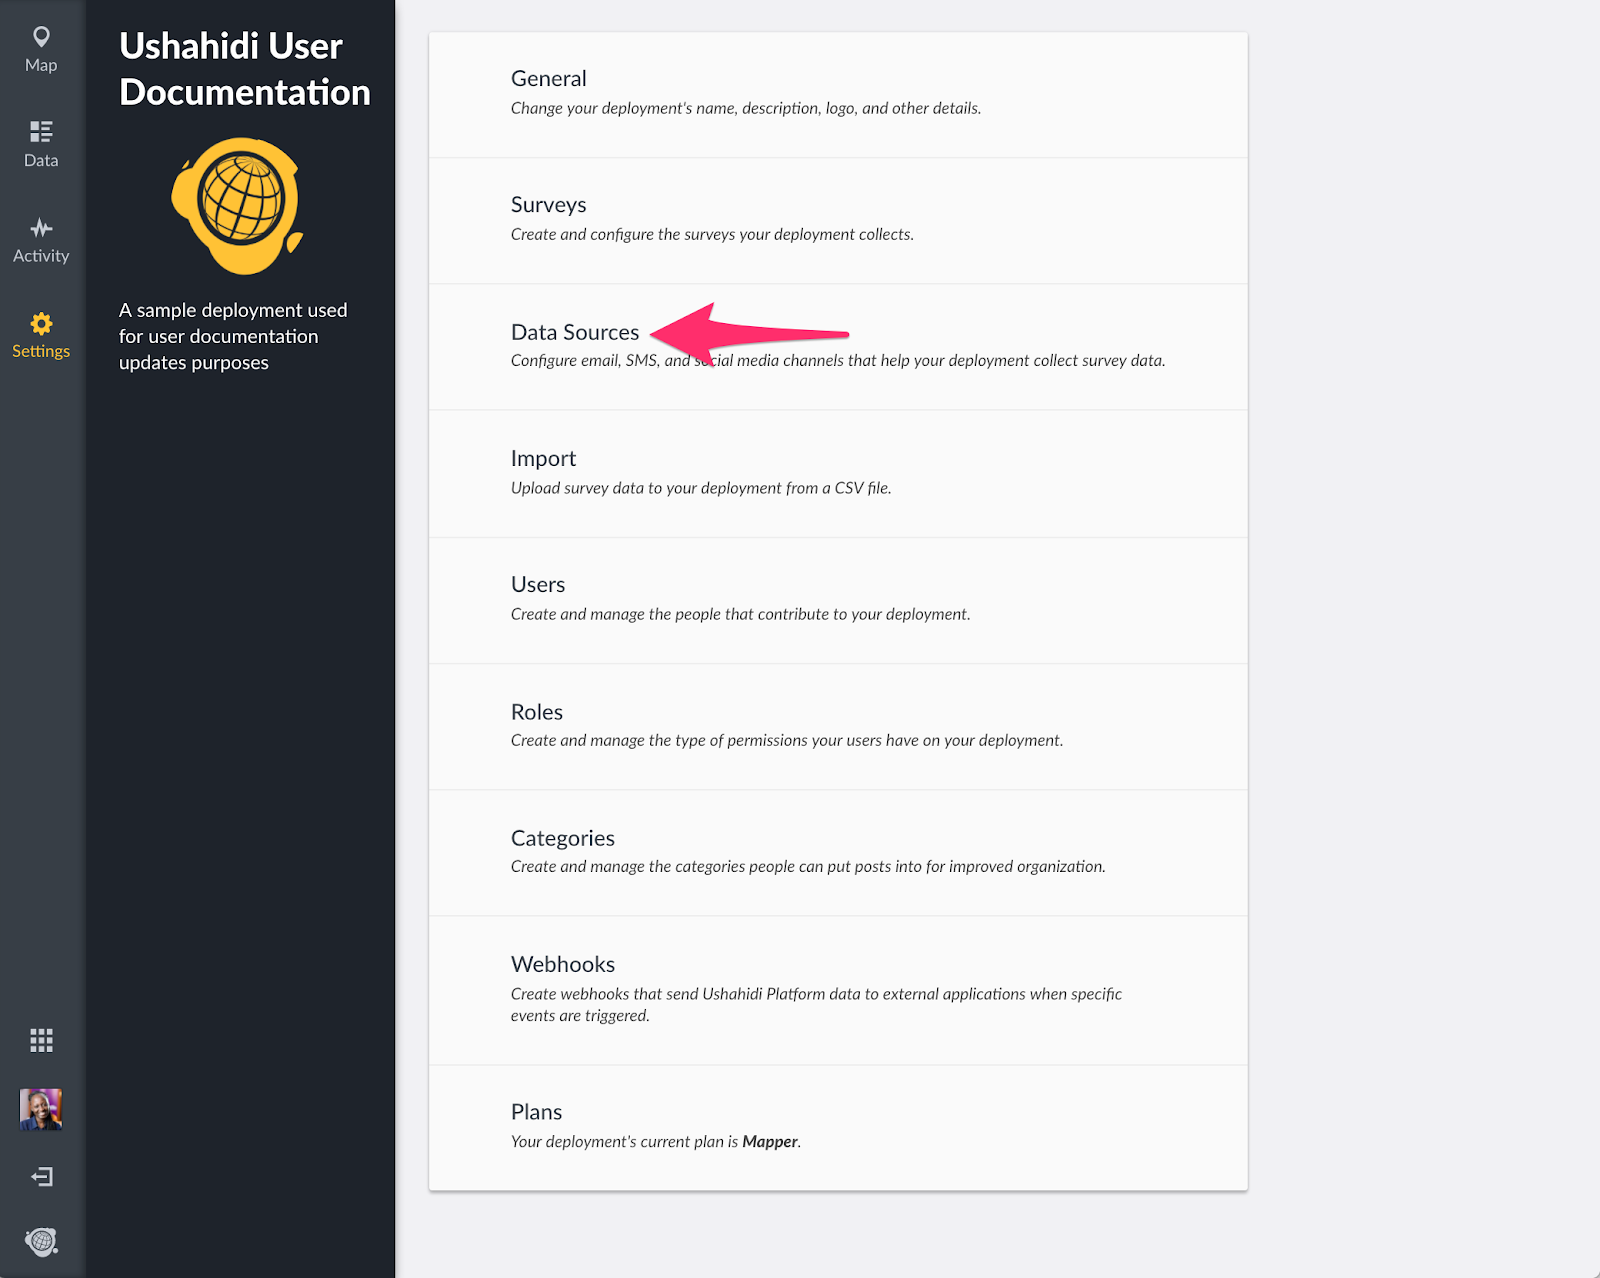
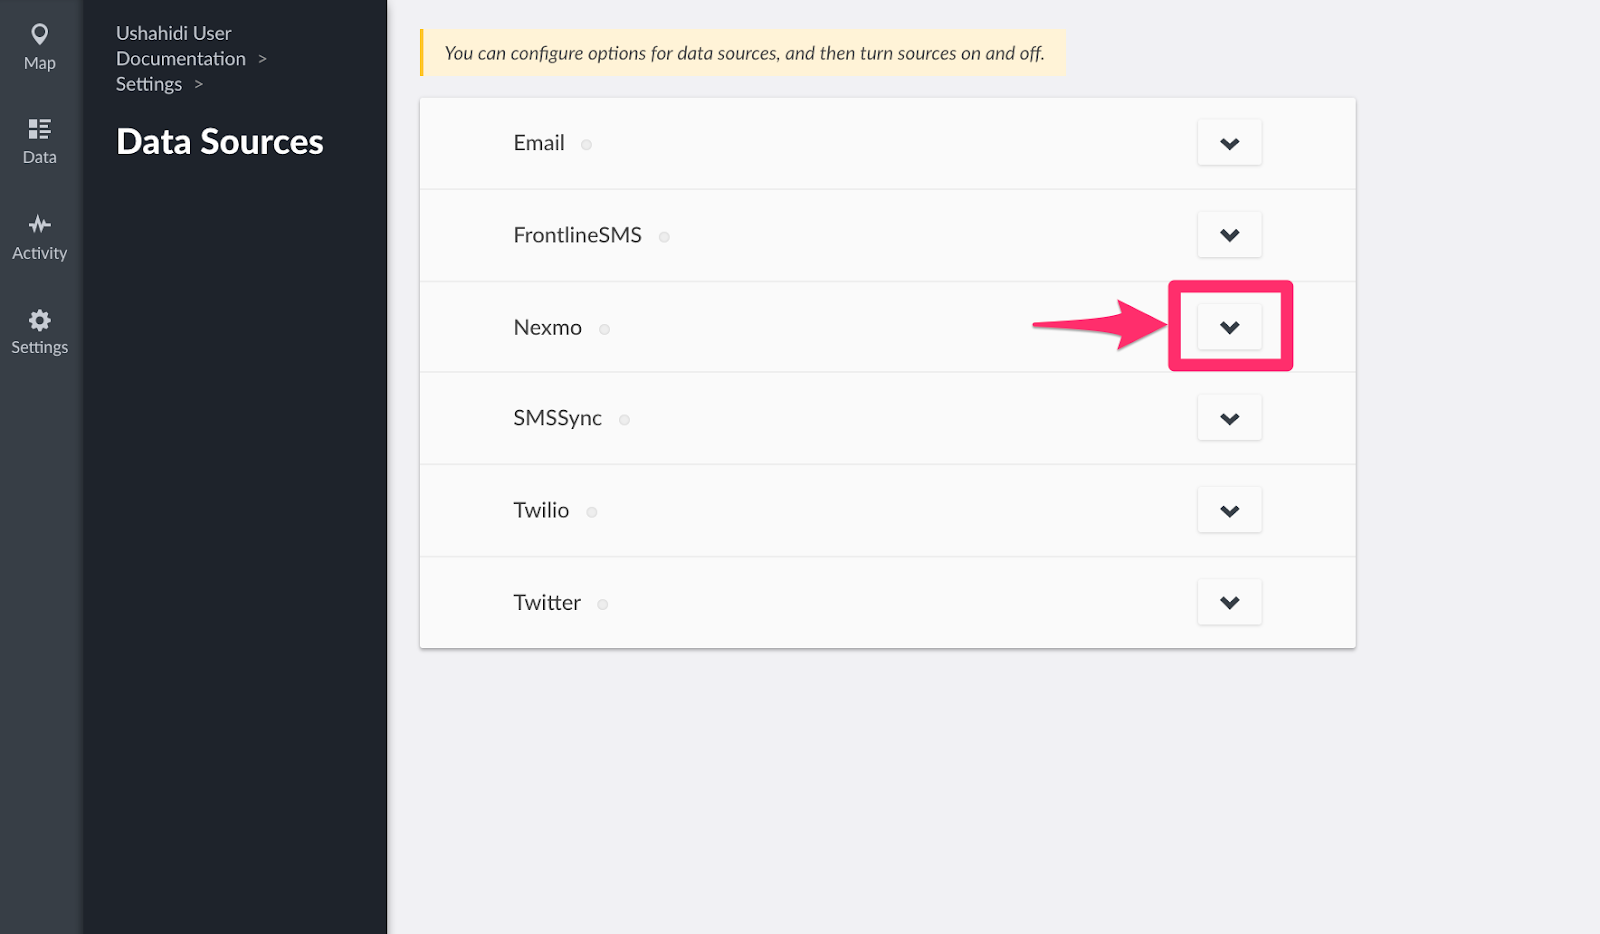
You should get a full list of data sources as shown below
Email
This section allows you to set up the platform to receive emails from user. Before getting started, make sure that you have an email account set up on Gmail, Yahoo or any other service provider. Make sure that you have IMAP/POP enabled (For more information on these two protocols, visit this website. Instructions on how to enable the IMAP/POP settings in your email can be found here
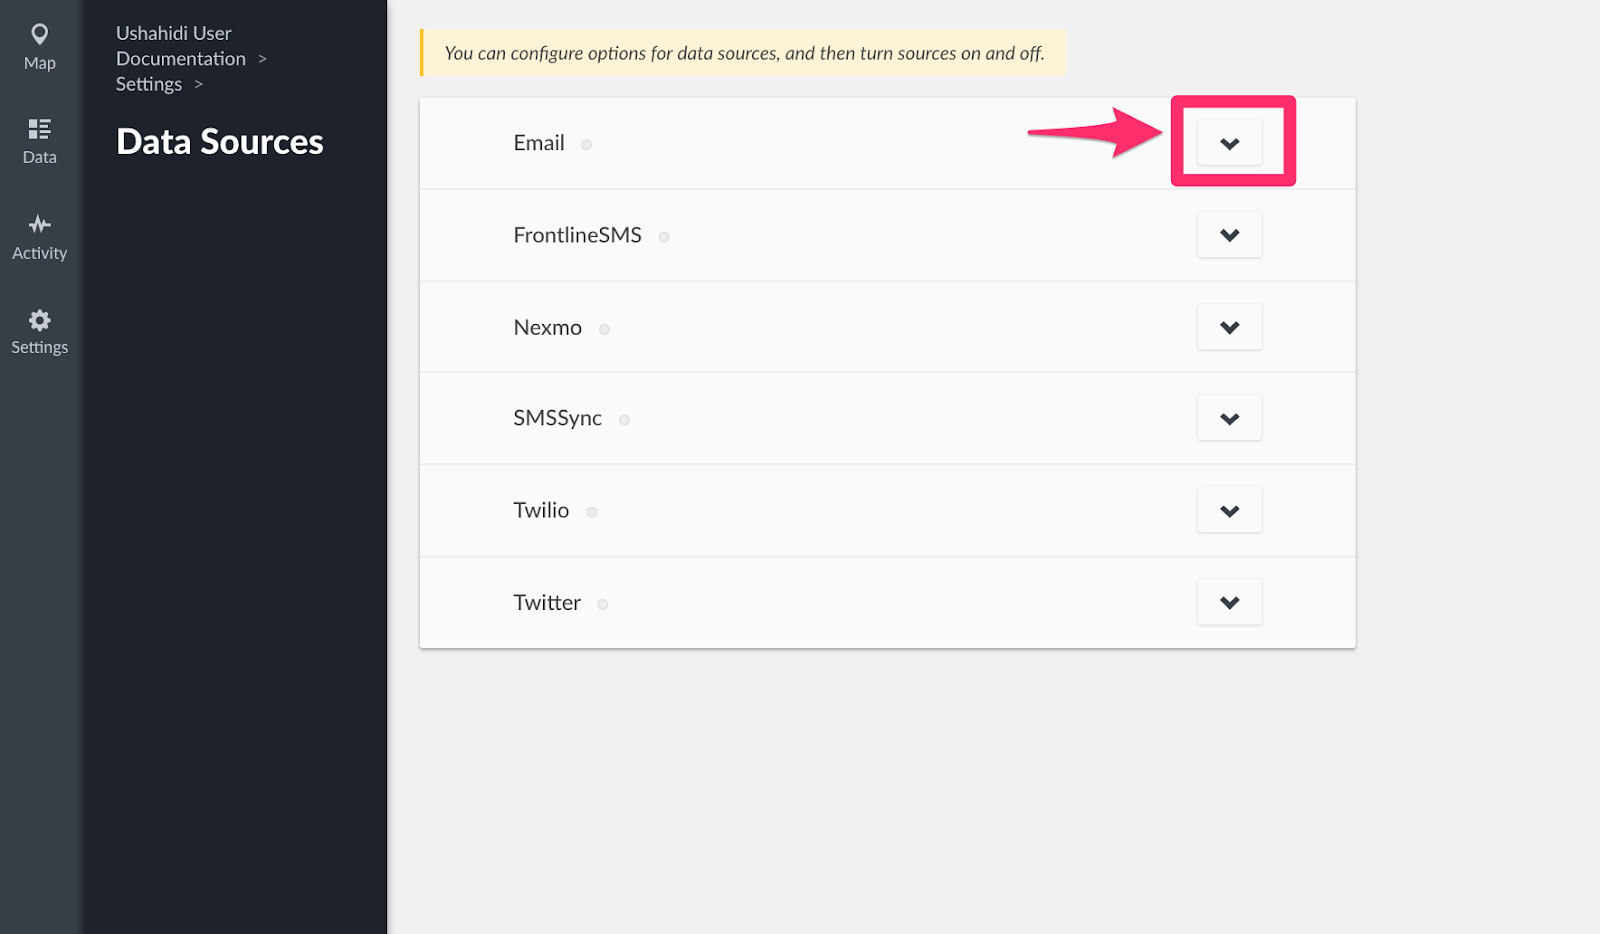
To get started with email set up,
- Click on the drop down icon on the right as shown
- Input the following email account settings:-
- Incoming server type: You have two options to select from, POP and IMAP. We recommend using IMAP if possible because it’s the best way to make sure you can see all your mail at any time on all of your devices
- Incoming server: Enter the address of the server where your email services are hosted. E.g mail.yourwebsite.com, imap.gmail.com or pop.gmail.com
- Incoming server port: Enter the port that your email account uses for incoming emails. This is also provided by your service provider and depends on the use of SSL(Secure Sockets Layer)/Transport Layer Security(TLS) or not. As a standard rule;
- IMAP uses port 143 , but SSL/TLS encrypted IMAP uses port 993 .
- POP uses port 110 , but SSL/TLS encrypted POP uses port 995
- Incoming server security: You have 3 options to choose from to enhance secure connection to your email mailbox, depending on which is supported by your email service provider.
- None
- TLS - Read more on Transport Layer Security
- SSL - Read more on Secure Sockets Layer
- Incoming user name: Enter the email address you want to use to receive emails e.g sample@youremail.com. We recommend setting up a separate email address for this purpose, preferably one that has lot of available space to avoid the account getting full in a short time, especially if the platform will be receiving a lot of submission via email.
- Incoming password: Enter the password of the email account inserted above.
- Outgoing server type: Select one of the three options presented to you:-
- SMTP: Simple Mail Transfer Protocol (SMTP) is recommended for use with the ushahidi platform.
- Sendmail
- Native
- Outgoing server: Enter the address of the server from which emails are sent out. This is also provided by the email service provider
- Outgoing server port: Enter the port your email service provider uses for outgoing emails. The default port tends to be 25, but SMTP with SSL support uses port 465 or 587
- Outgoing server security: Select one of the three options provided to you
- None
- SSL
- TLS, which is recommended by the service provider for outgoing server security.
- Outgoing user name: Enter the email address you want to use to send emails. E.g sample@youremail.com
- Outgoing password: Enter the password of the email account inserted above.
- Email sender name: This is what appears in the “from” field in outgoing emails.

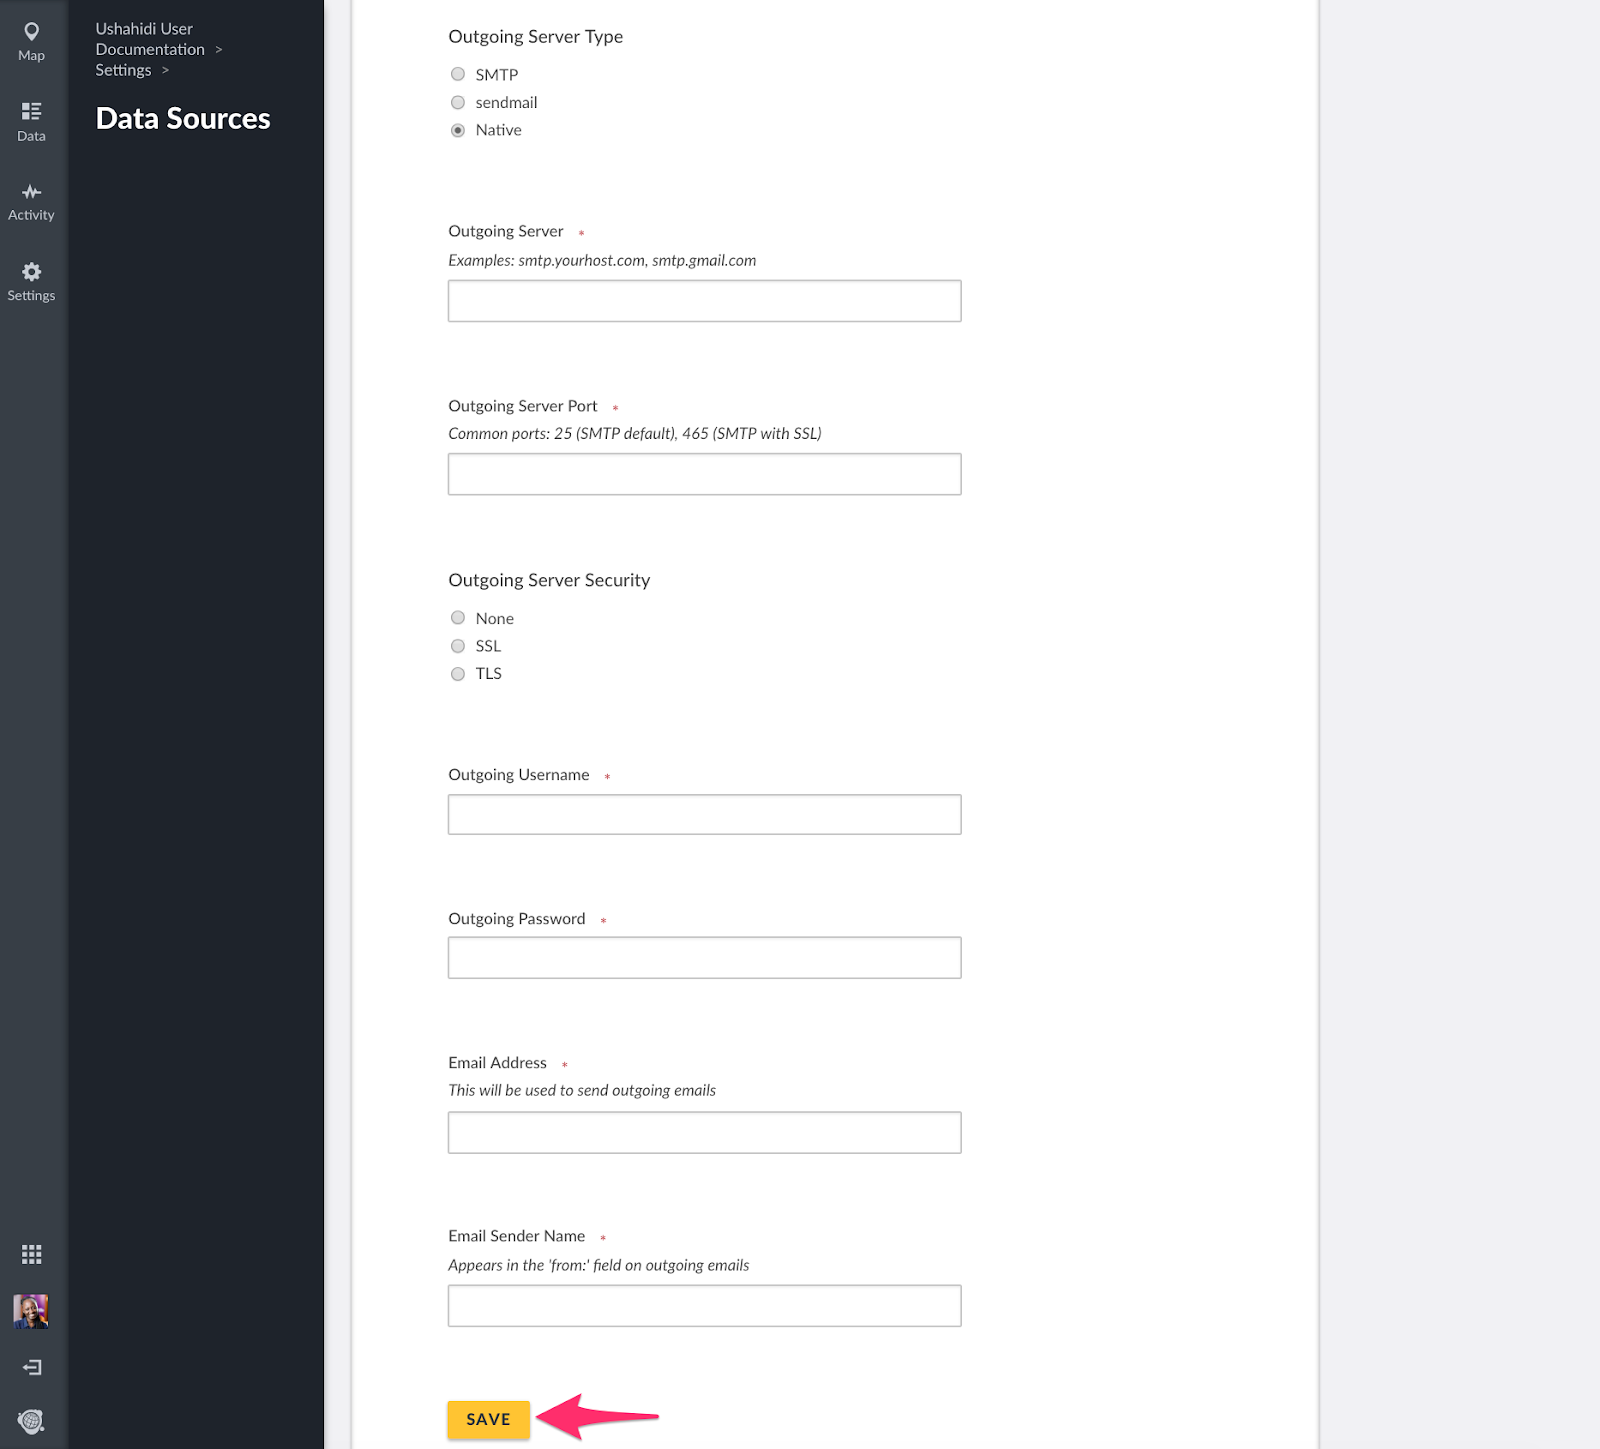
- Click on Save and this data source’s settings will be saved. Unstructured posts from email will now be pulled into the platform.
- To enable/disable the email data source, simply click on the green toggle.

If you’d like to edit your email configuration, simply click on the drop down icon on the right while on the data sources list page and make your changes.
Nexmo
Nexmo is a cloud-based SMS API that lets you send and receive a high volume of messages to mobile phones in any country at wholesale rates.
NB: You need a nexmo account to be able to configure this as a data source. To sign up, go to https://dashboard.nexmo.com/si...
To get started with Nexmo set up,
- Log into your Nexmo Dashboard https://dashboard.nexmo.com
- If you haven’t already, you’ll need buy a number that you will use to receive SMS messages from.
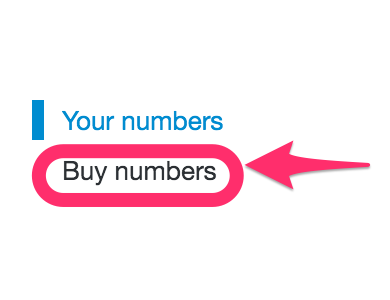
- Click on Numbers on the top menu bar on your nexmo dashboard

- Click on Buy Numbers
- Set the desired criteria of the phone number you’re looking to use

- Select the country in which the SMS Number will likely be operating in
- Select the features of this phone number(SMS only, Voice only or SMS & Voice)
- Select the type of phone number it will be (Mobile, Landline, Toll free)
- Click on Search. A list of available numbers based on the criteria set above will appear.
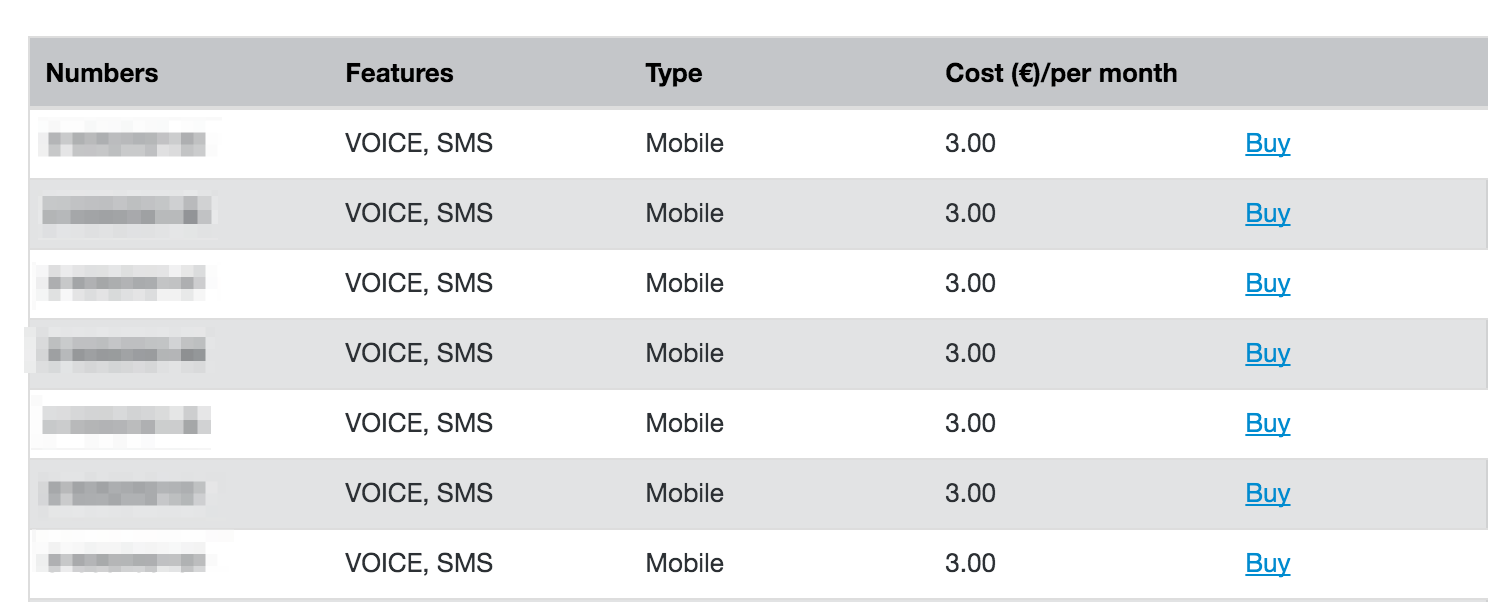
- Click Buy on the number you’d like to use.
- Once you have a phone number, note it down as you’ll need it to configure your data source later on.
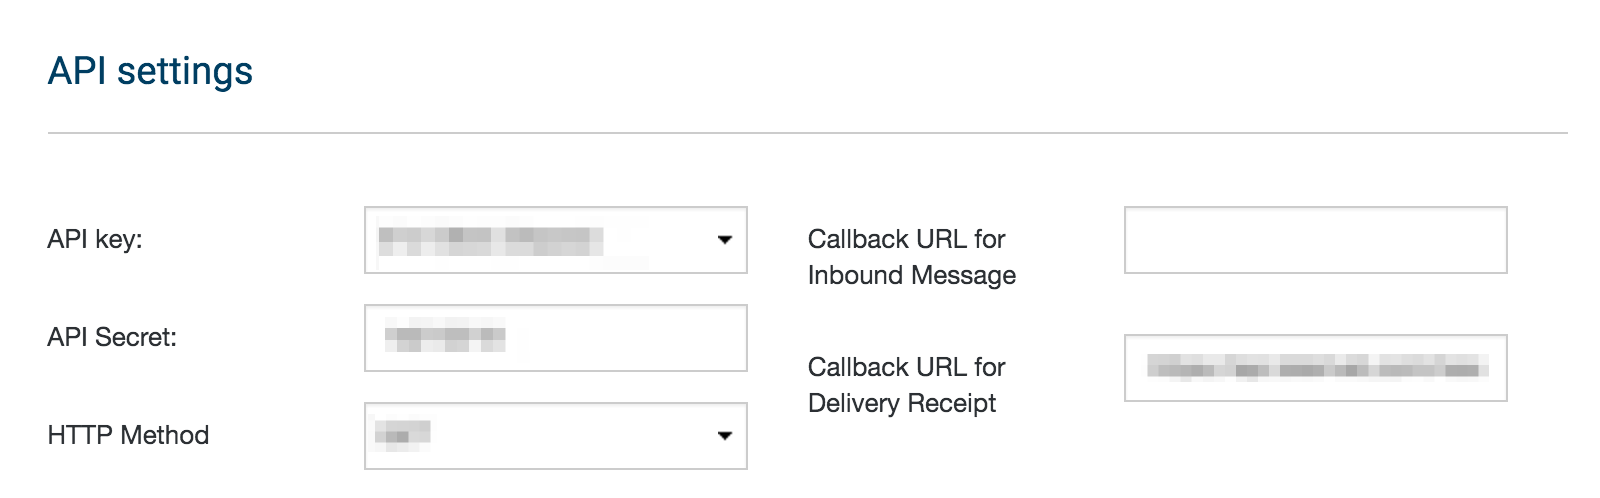
- You’ll need to grab your API credentials from your nexmo settings page.
- Pick your API KEY and API SECRET from the API Settings section.
- Go back to your Data source settings page on your deployment
- Click on the drop down icon on the right to get to your Nexmo configuration page
- Enter the following details, which you got earlier from your Nexmo Dashboard
- From: Enter the phone number you will use to receive SMS messages from your nexmo account
- Secret: Enter a secret value for security purposes.
- API KEY: Enter the API key retrieved from your nexmo settings page.
- API SECRET: Enter the API secret retrieved from your nexmo settings page.
- Click on Save and this data source’s settings will be saved. Unstructured posts from SMS will now be pulled into the platform from Nexmo.

- To enable/disable the nexmo data source, simply click on the green toggle.

If you’d like to edit your nexmo configuration, simply click on the drop down icon on the right while on the data sources list page and make your changes.
SMSSync
SMSsync is a simple, yet powerful SMS to HTTP sync utility that turns any Android phone into a local SMS gateway by sending incoming messages (SMS) to a configured URL (web service).
To get started with SMSSync set up,
- Click on the drop down icon on the right as shown

- Follow the instructions given to you below.
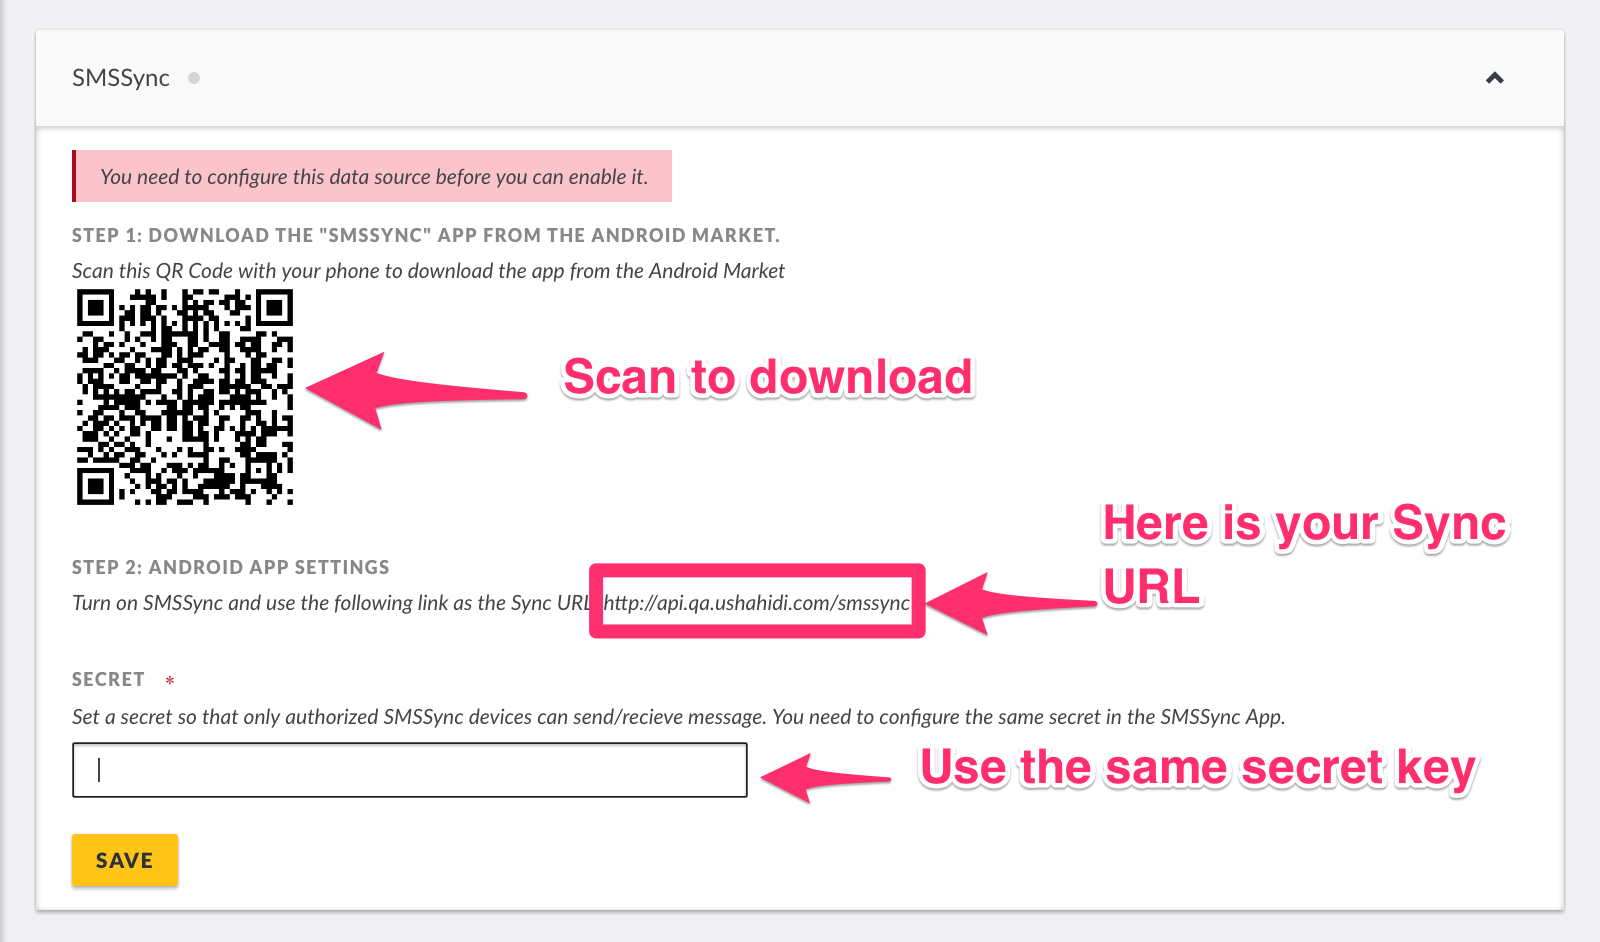
- Download the application from the Android Market by scanning the QR Code presented to you on the settings page or simply search for it in the android market.
Please note that SMSsync works on any SMS-enabled device running Android 2.1 and above.
- Retrieve the Sync URL, which you’ll need to configure SMSSync with under Step 2: ANDROID APP SETTINGS
- You can also set an SMSSync secret key for security purposes
- Click on Save
- Open up the SMSSync Application on your android device. You’ll note that you can manage multiple Sync URLs on the app.
- To add a new Sync URL
- Tap on the Sync URL from the navigation drawer.
- Tap on the Add icon icon on the actionbar. An input dialog should open.
- Enter a title for the Sync URL.
- Enter a secret key(If you set one above). Make sure you enter the exact key here.
- The secret key should be presented as string of any characters without spaces.
- Enter a comma separated value for the keyword(s). These keywords will be used by SMSsync to filter incoming SMS and pending messages to the Sync URL you are adding. As of v2.0.2. You can now add Regular Expression code for filtering. This means, it can either be CSV or RegExp. It cannot be both.
- Enter the URL for your web service. Don't forget to start with the HTTP or HTTPS protocol. e.g. https://example.com/api-v1/add-record/
- Tap OK to save the new entry.
Note: Version 2.5 or higher supports basic auth credentials in the URL, e.g. https://username:pass@example.com/api-v1/add-record/.
- You will now need to start the SMSSync Service to start forwarding messages to the platform. To start the SMSSync service
- Make sure that you have added and enabled(checked) the Sync URL you added above.
- On the SYNC URL screen, tap on the Start SMSsync service to start the service. You only do this if the service is disabled.
- You should be all set to work with SMSSync and Ushahidi now. Unstructured posts via SMS will now be pulled into the platform.
- To enable/disable the SMSSync data source, simply click on the green toggle.

- If you’d like to edit your SMSSync configuration, simply click on the drop down icon on the right while on the data sources list page and make your changes.
For more details on how to manage messages within SMSSync, see configuration instructions on the SMSSync Website
Twilio
Twilio allows you to programmatically make and receive phone calls and send and receive text messages using its web service APIs.
NB: You need a Twilio account to be able to configure this as a data source. To sign up, go to https://www.twilio.com/try-twi...
To get started with Twilio set up,
- Log into your twilio account.
- You’ll need to buy a number to use. Click on PHONE NUMBERS.

- Click on Buy a number

- Select the desired criteria for your phone number
- Country
- Location/Number
- Capabilities (Voice, SMS, MMS)
- Click on Search. A list of available numbers based on the criteria set above will appear.

- Click Buy on the number you’d like to use.

- Once you have a phone number, note it down as you’ll need it to configure your data source later on.
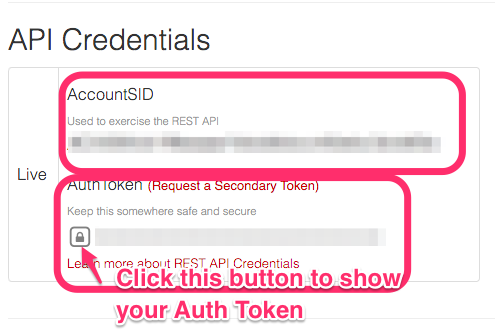
- You’ll need to grab your API credentials from your Twilio Account settings page.
- Pick your ACCOUNT SID and AUTH TOKEN from the API Credentials section.
- Go back to your Data source settings page on your deployment
- Click on the drop down icon on the right as shown
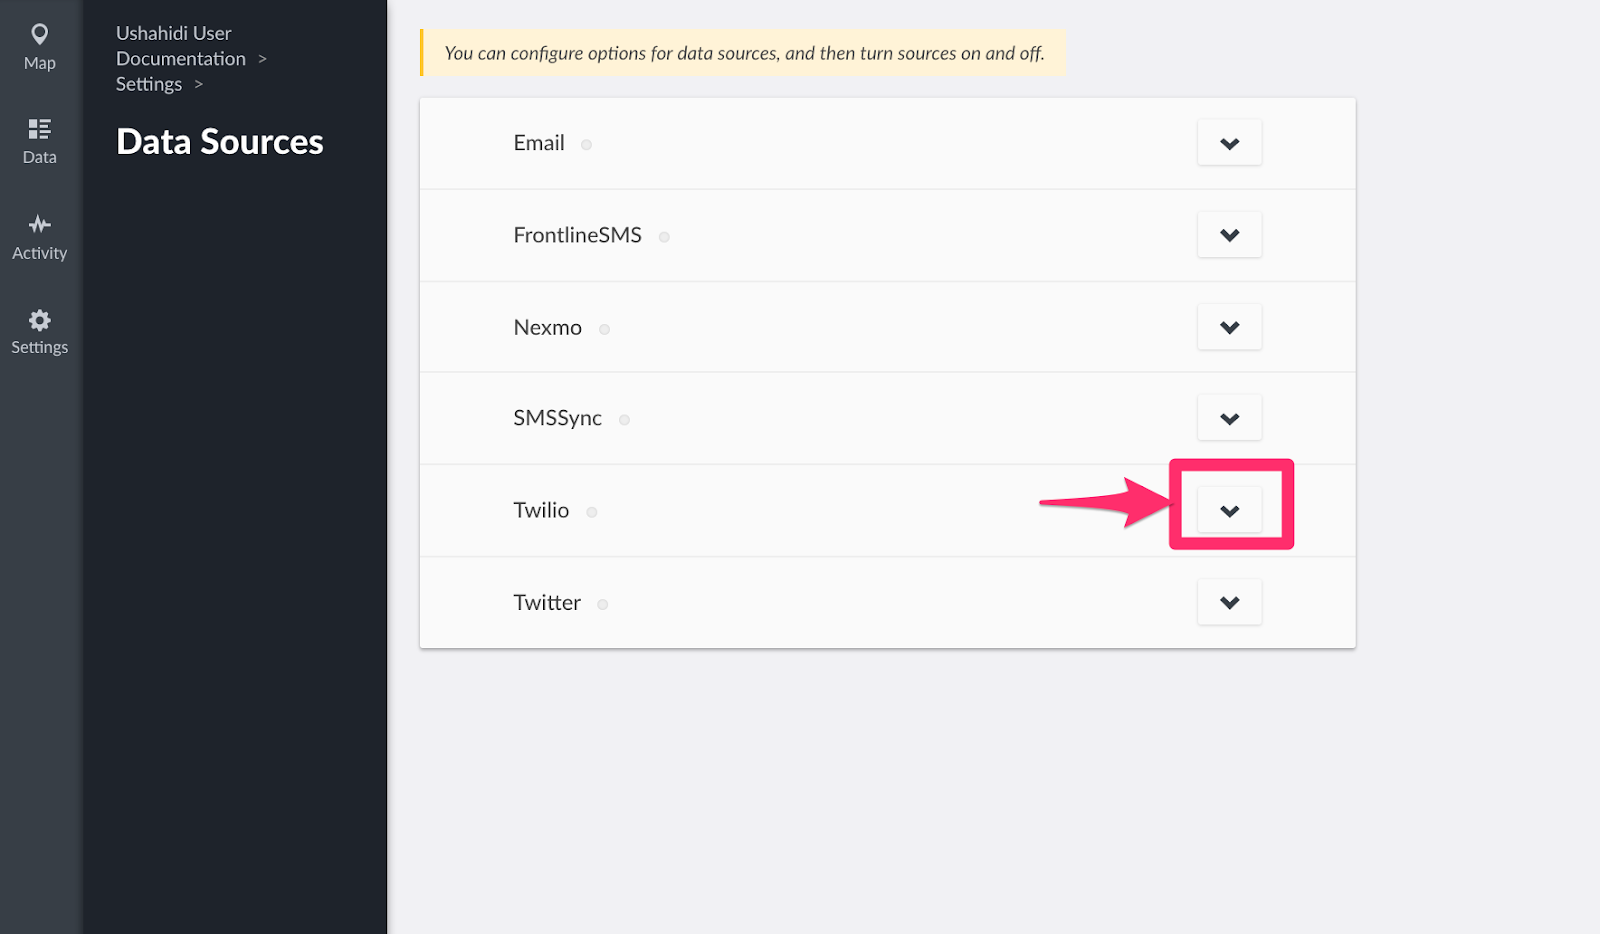
- Enter the following details, which you got earlier from your Twilio Account
- From: Enter the phone number you will use to receive SMS messages from your twilio account
- ACCOUNT SID: Enter the unique ID of your twilio account
- AUTH TOKEN: Enter the Auth Token retrieved from your twilio settings page.
- SMS Auto Response: This will likely be the message sent back to users who send you SMS Messages.
- Click on Save and this data source’s settings will be saved. Unstructured posts from SMS will now be pulled into the platform from Twilio.

- To enable/disable the Twilio data source, simply click on the green toggle.

- If you’d like to edit your Twilio configuration, simply click on the drop down icon on the right while on the data sources list page and make your changes.
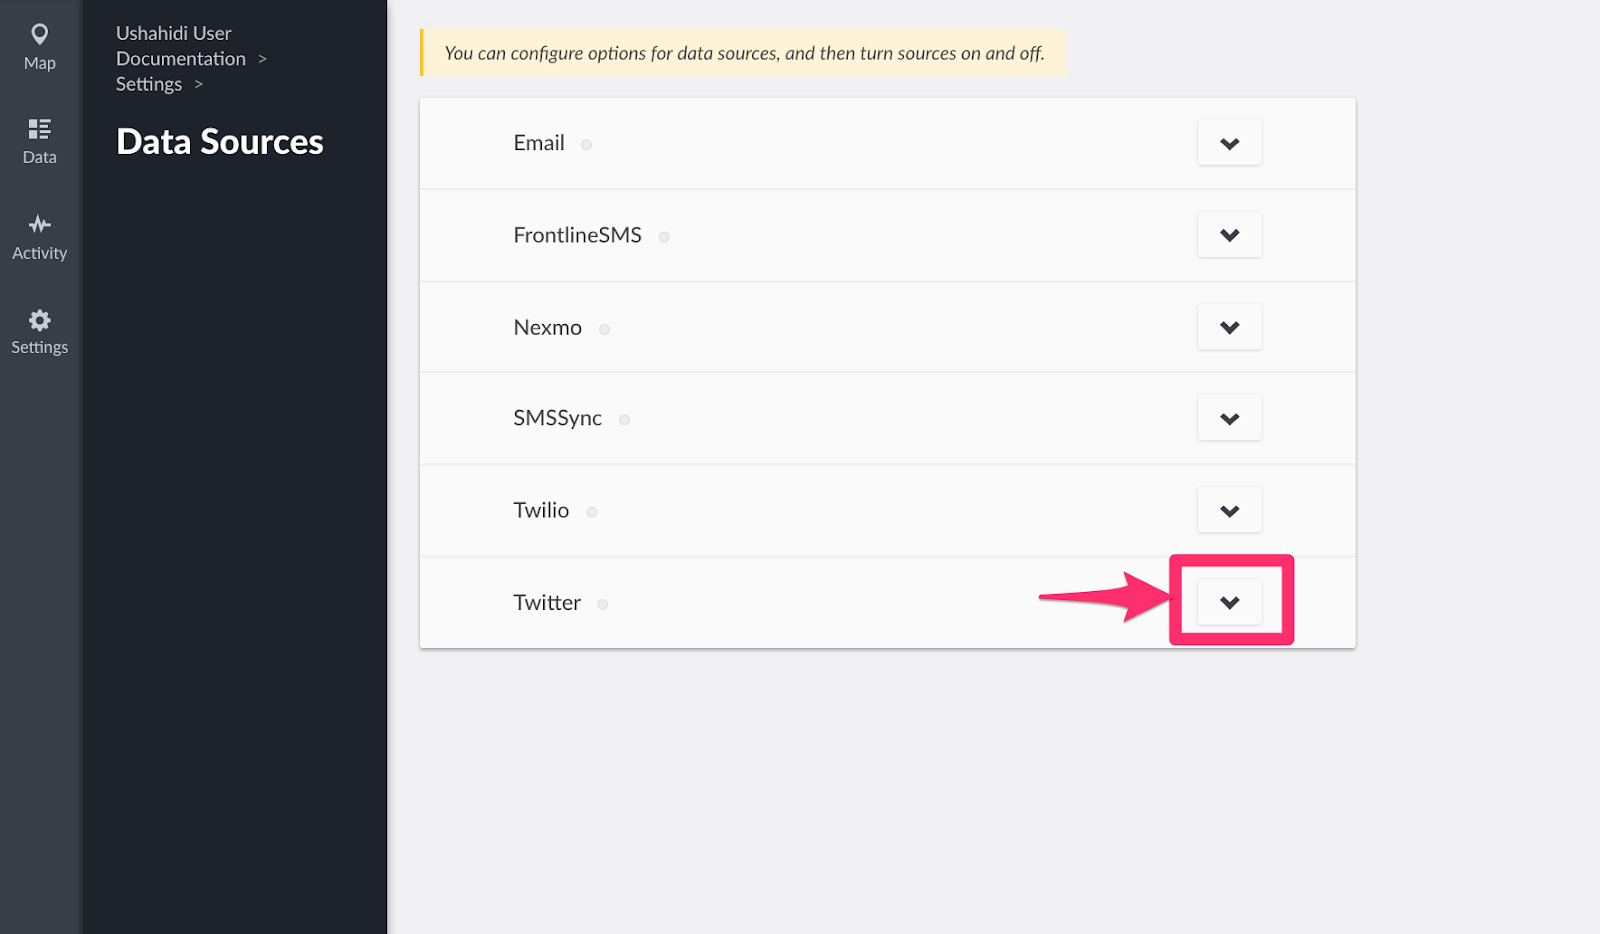
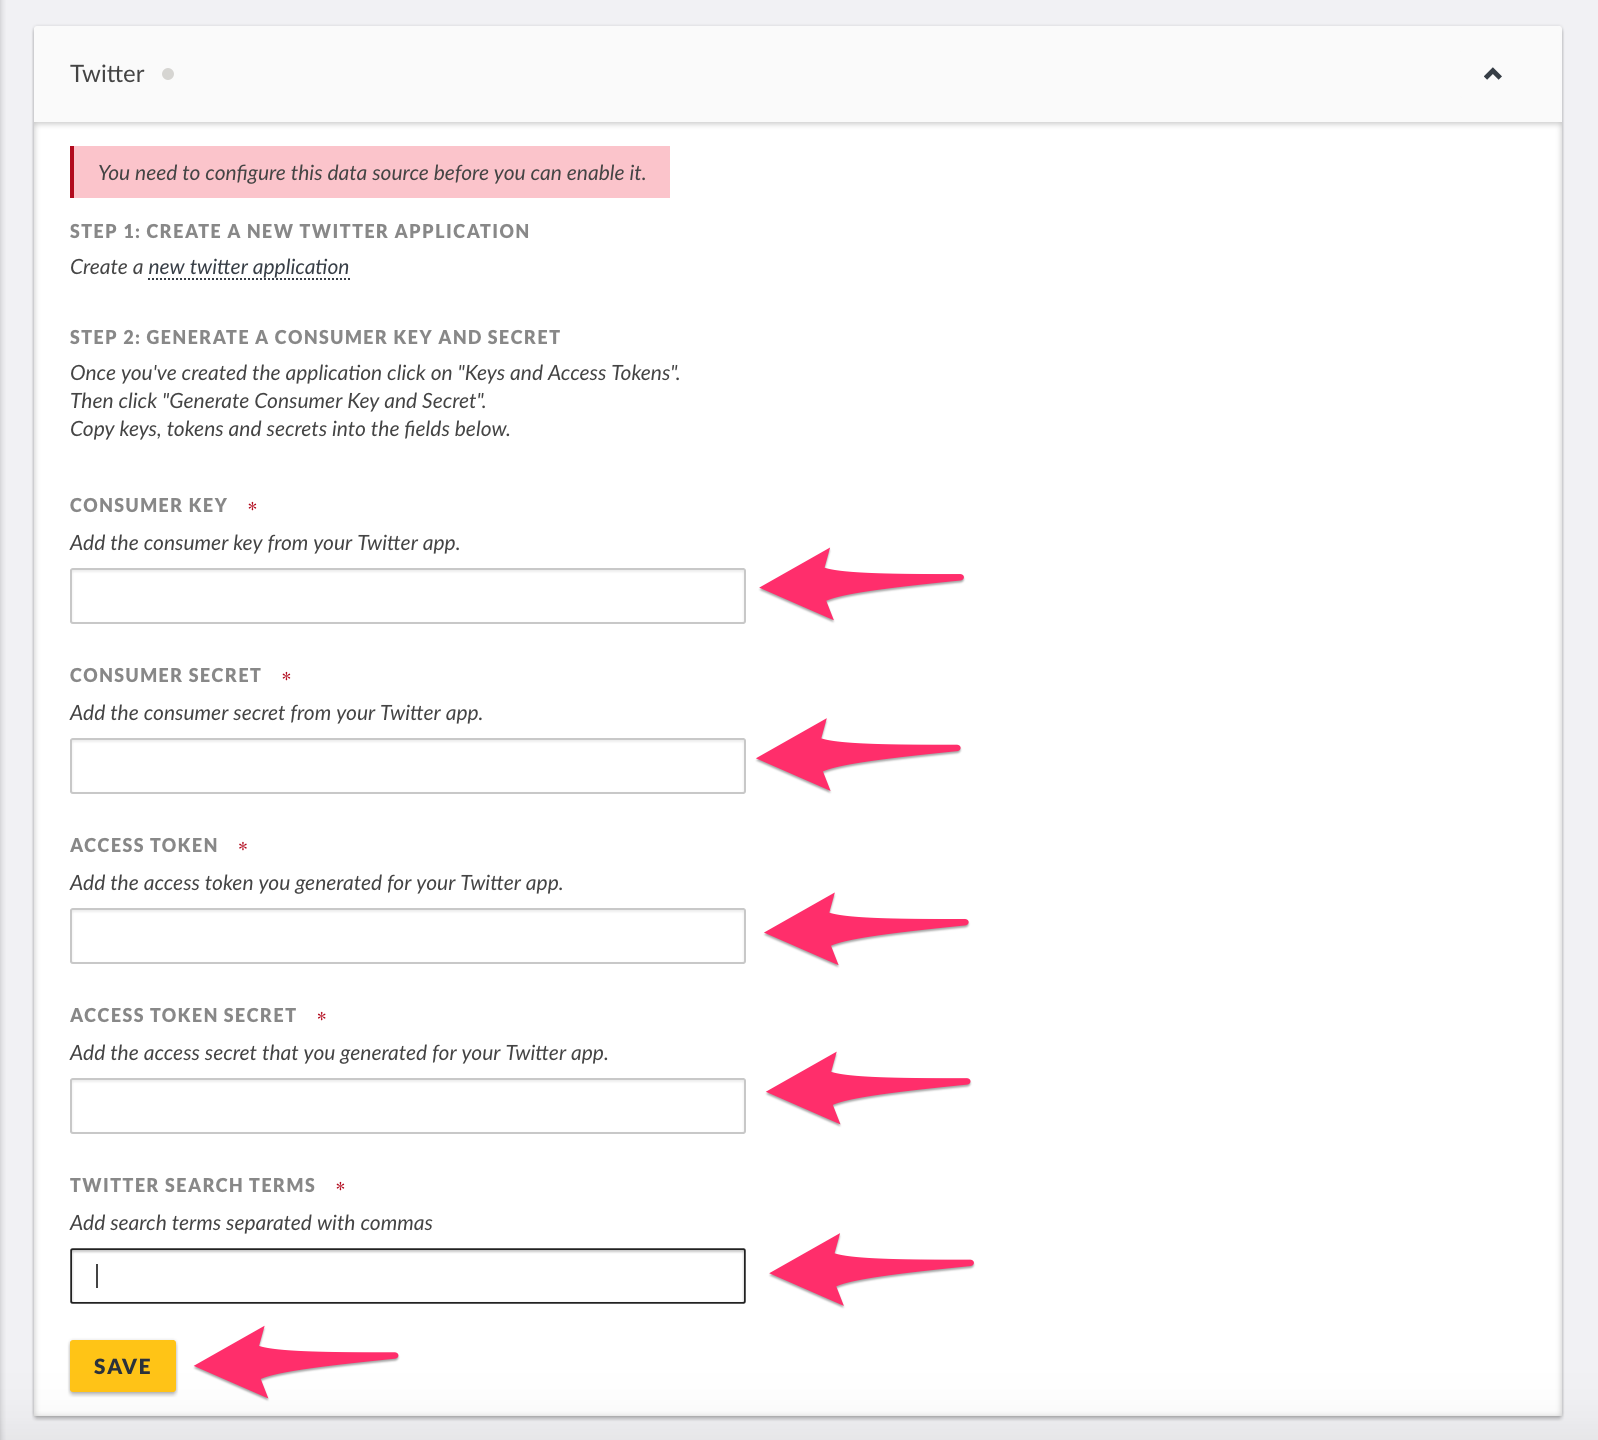
Twitter
This section allows you to configure twitter as a data source, and subsequently pull unstructured posts from specific twitter hashtags.
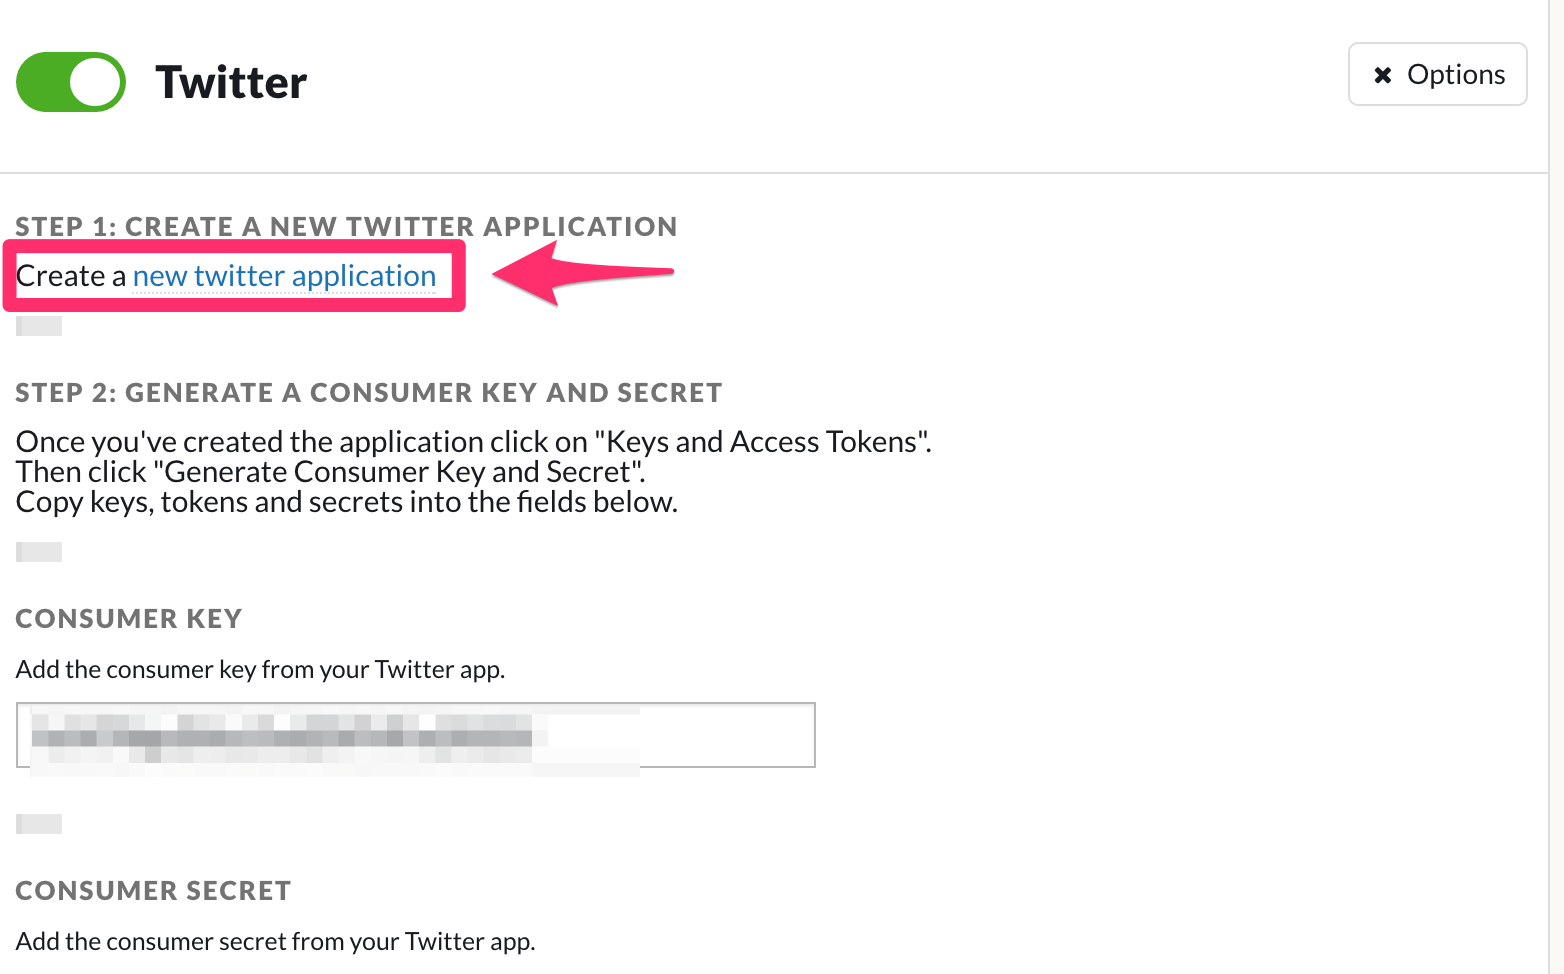
For you to be able to pull tweets based on hashtags, you will need to set up your ushahidi deployment as an application on twitter. To get started,
- Click on the drop down icon on the right as shown
- Click on Create a new twitter application. This will redirect you to https://apps.twitter.com
- Sign into https://apps.twitter.com using your twitter username and password
- Click on “Create New App”

- Fill in the application details
- Name – this can be your deployment/site name e.g Uchaguzi
- Description – this is your deployment/site description – what your deployment does
- Website – this is your deployment url/link i.e http://yourdeployment
- Callback url – Leave this blank.
- Agree to the terms and conditions then click on Create your twitter application
- Once your application has been successfully created, you should now be able to access your access keys and tokens. To do so, click on Keys and Access Tokens or Manage Keys and Access
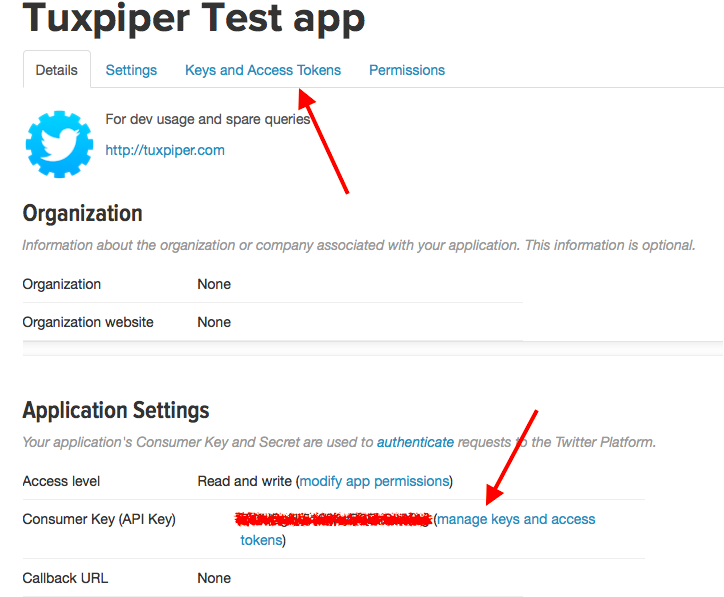
- You’ll get redirected to a page where you can grab details needed to configure your Ushahidi deployment i.e CONSUMER KEY, CONSUMER SECRET, ACCESS TOKEN, ACCESS TOKEN SECRET.
- You’ll have to generate an ACCESS TOKEN and ACCESS TOKEN SECRET by clicking on Generate my access token and token secret. This may take a couple of minutes, and your page will refresh with all the details you require.
- Go back to your twitter configuration page on your deployment and fill in all the details from your twitter app management page.
- Add the hashtags you want to pull tweets from in the “Twitter Search Terms” section. You can choose more than one hashtag, separated by a comma. It is recommended that short and clear hashtags be chosen.
- Click on Save and this data source’s settings will be saved. Unstructured posts from twitter will now get pulled into the platform.
- To enable/disable the twitter data source, simply click on the green toggle.
- If you’d like to edit your twitter configuration, simply click on the drop down icon on the right while on the data sources list page and make your changes.

FrontlineSMS
FrontlineCloud is an online SMS management platform that lets you control and manage 2-way SMS engagement with anyone in the world.
NB: You need a FrontlineCloud Starter or Pro account to be able to configure this as a data source. To sign up, go to https://cloud.frontlinesms.com...
To get started with FrontlineCloud set up,
- Log into your FrontlineCloud account.
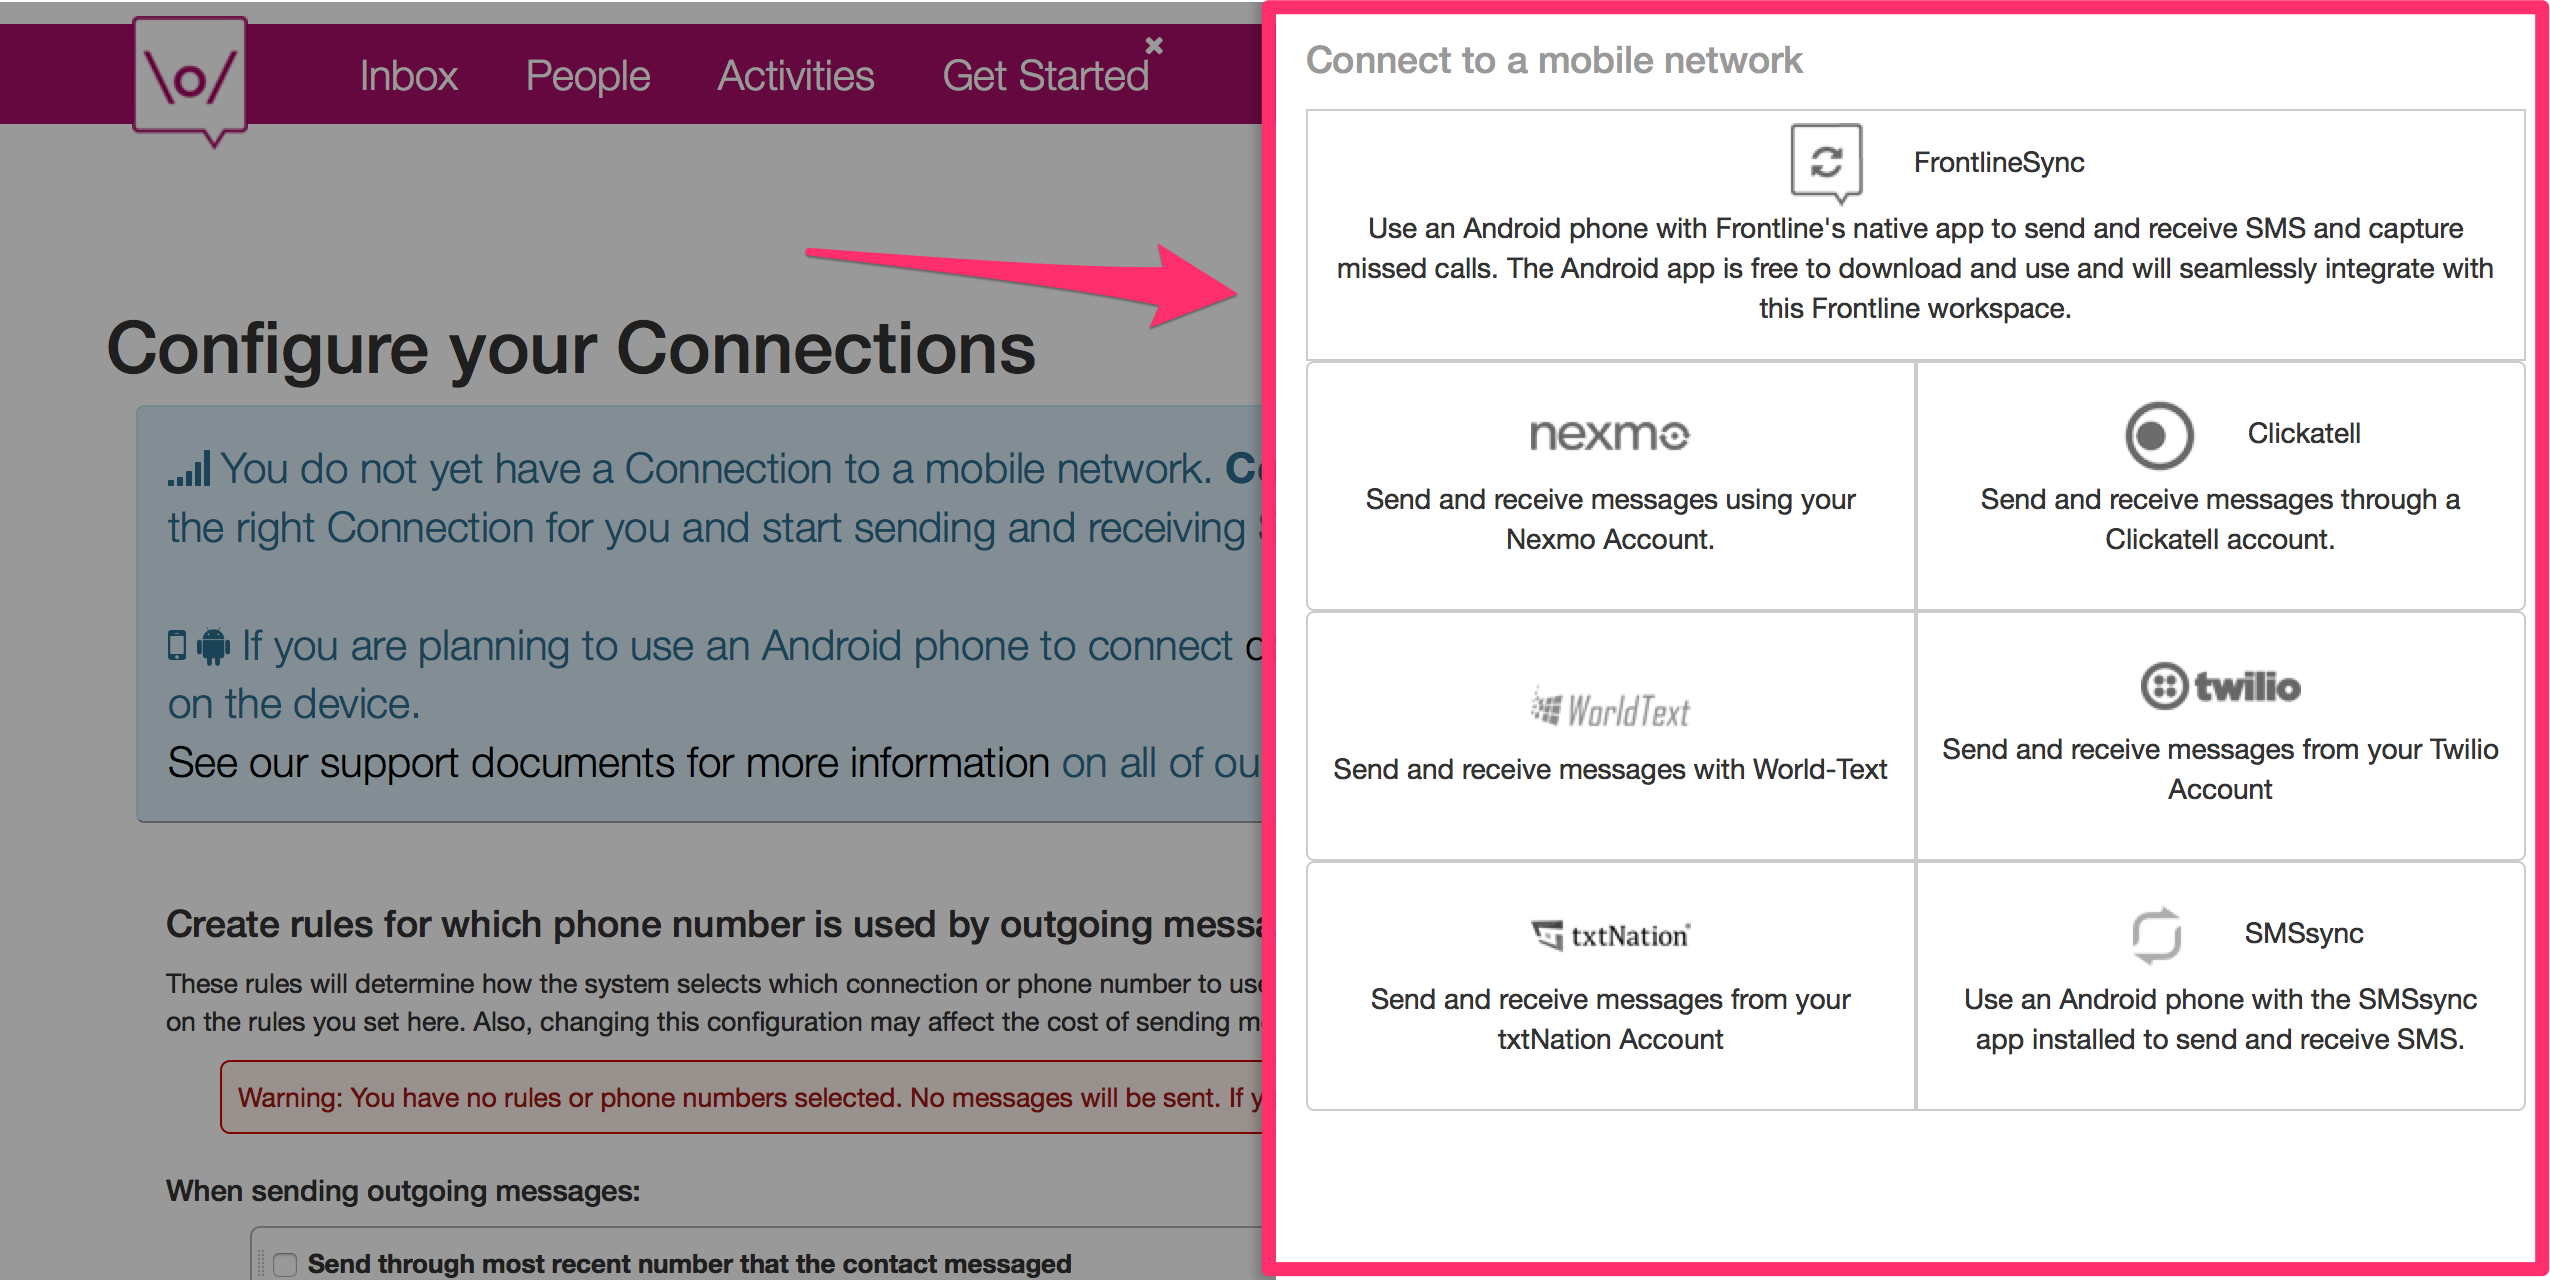
- You’ll need to setup your network connection
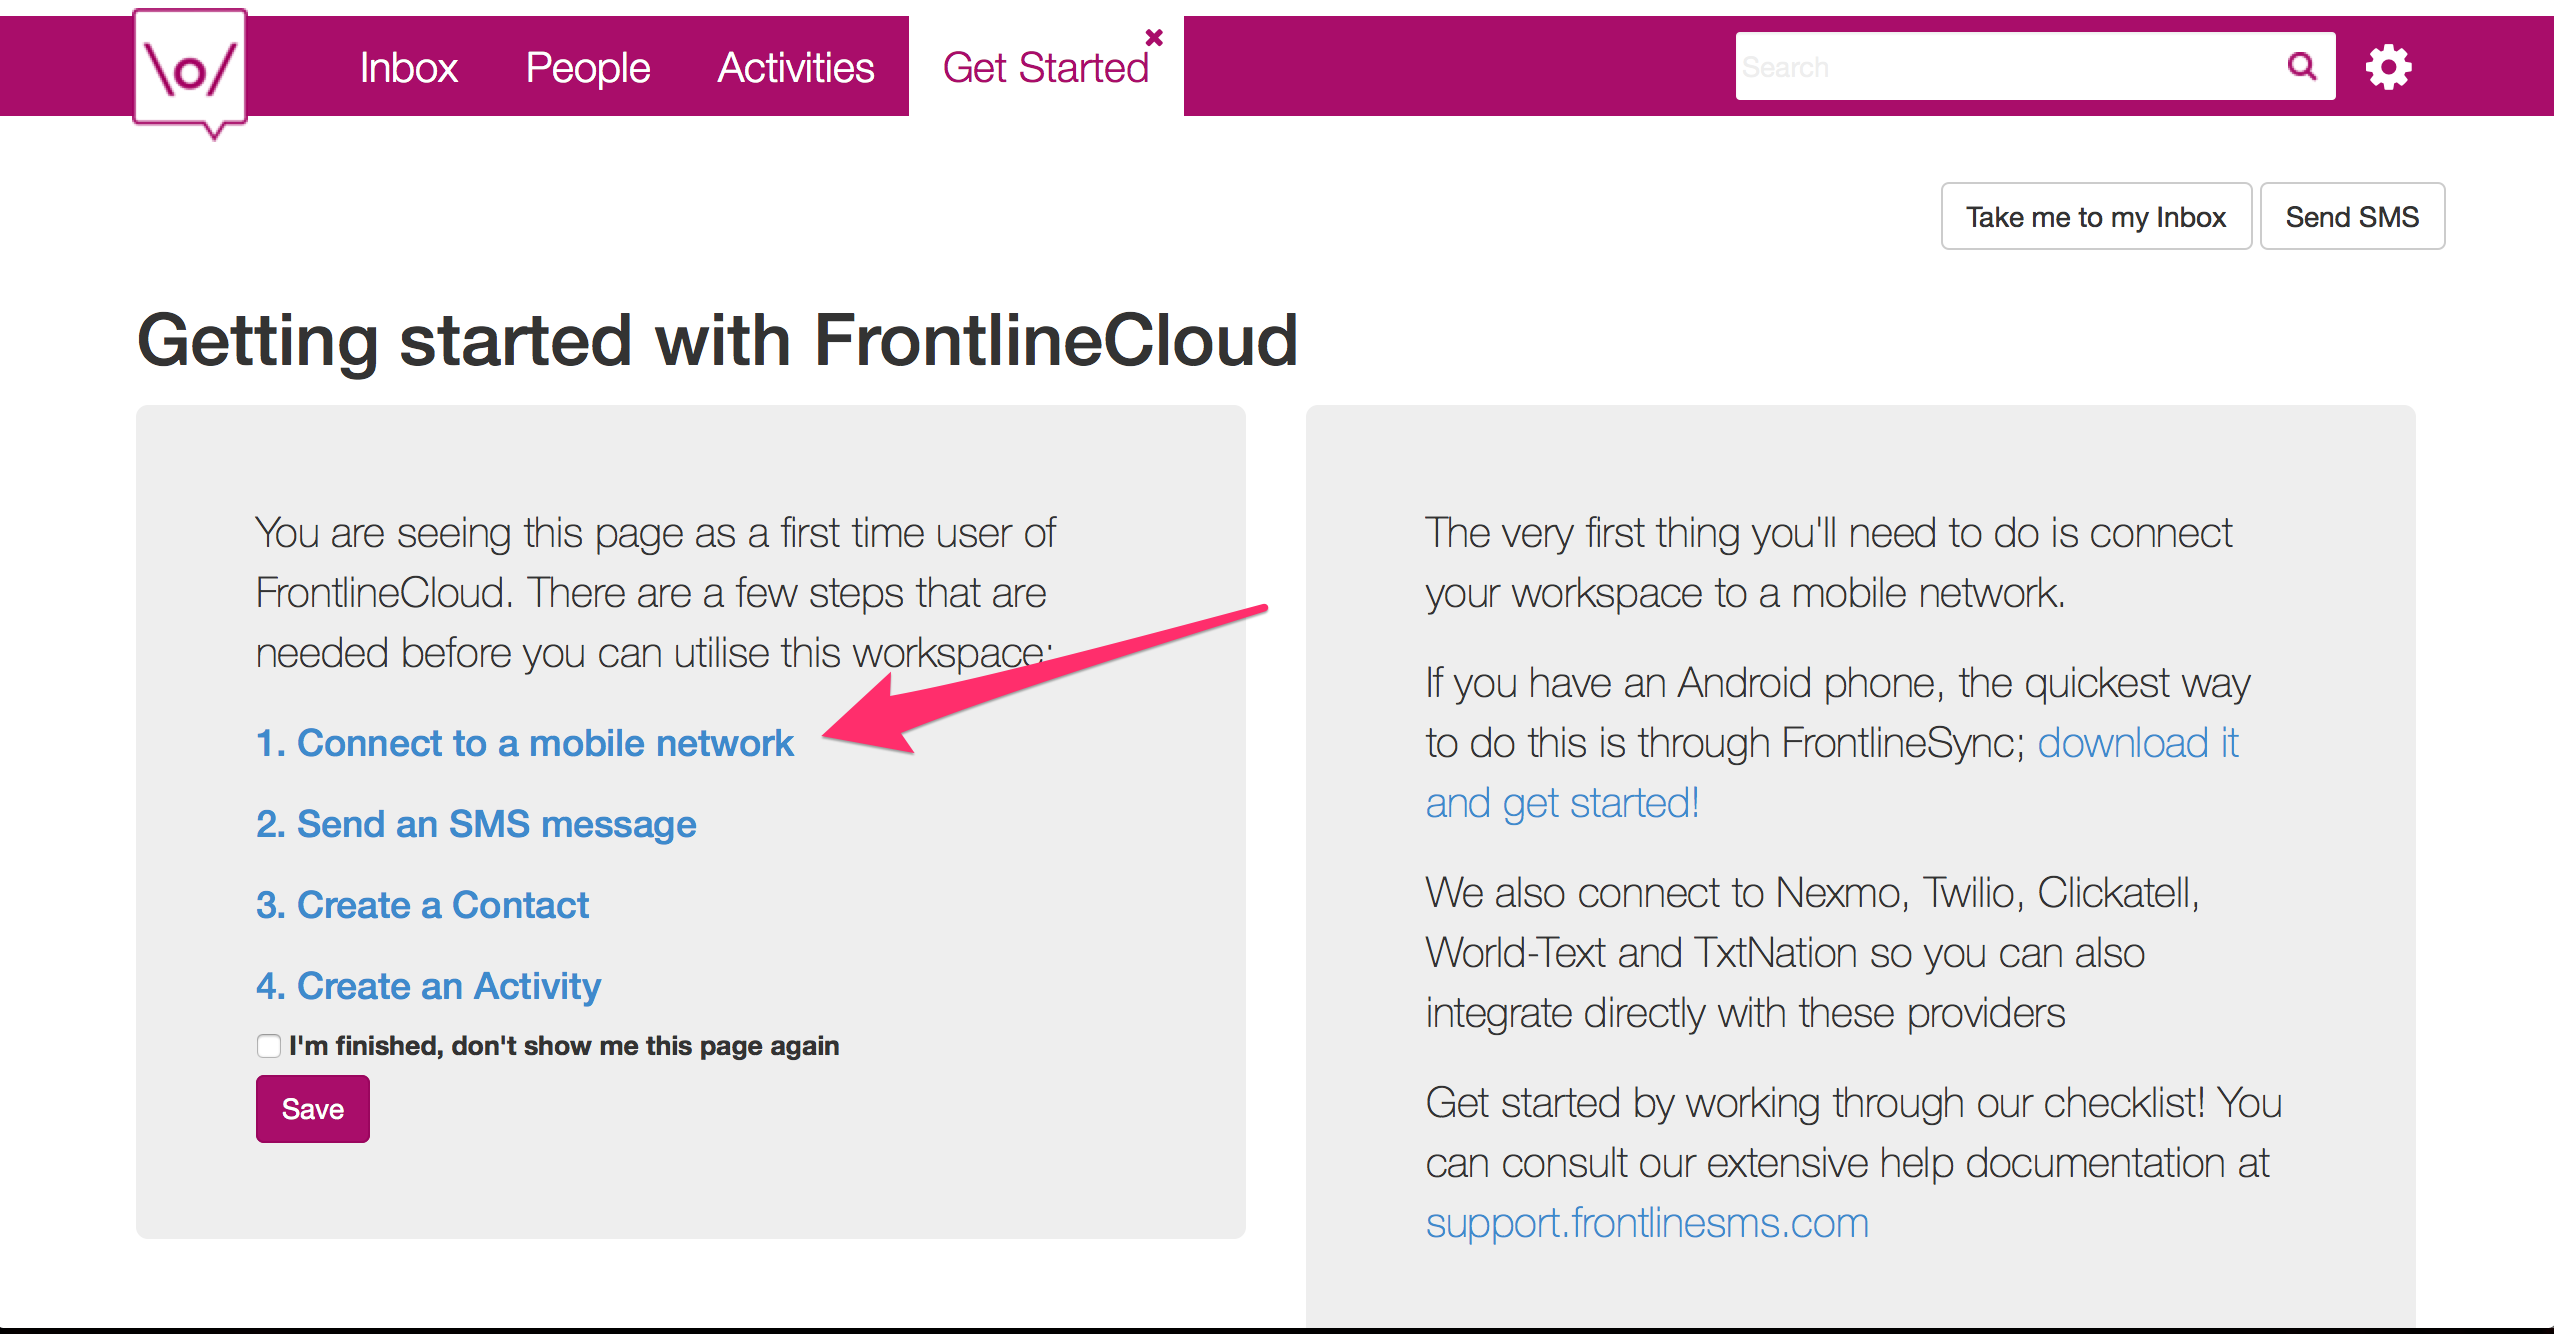
- Click on Connect to a Mobile Network
- Choose your mobile network
- Once you have setup your mobile network, click Activities

- Next you will need to setup An Activity to allow sending SMS from Ushahidi via Frontline, to do this follow this guide
- Send SMS from a Web Service Activity
- Copy the API KEY generated during this step, as you will need it in the next step
- Setup the FrontlineSMS data source on your Ushahidi platform
- Click on the drop down icon on the right as shown
- Enter the FrontlineCloud API KEY that you generated in the previous step in the The Api Key box
- Enter a secret code in the Secret box , this code will be used by
FrontlineCloud to connect to the Ushahidi deployment. You can enter any
value you like here. It should ideally contain numbers and letters and
be ~20 characters long.
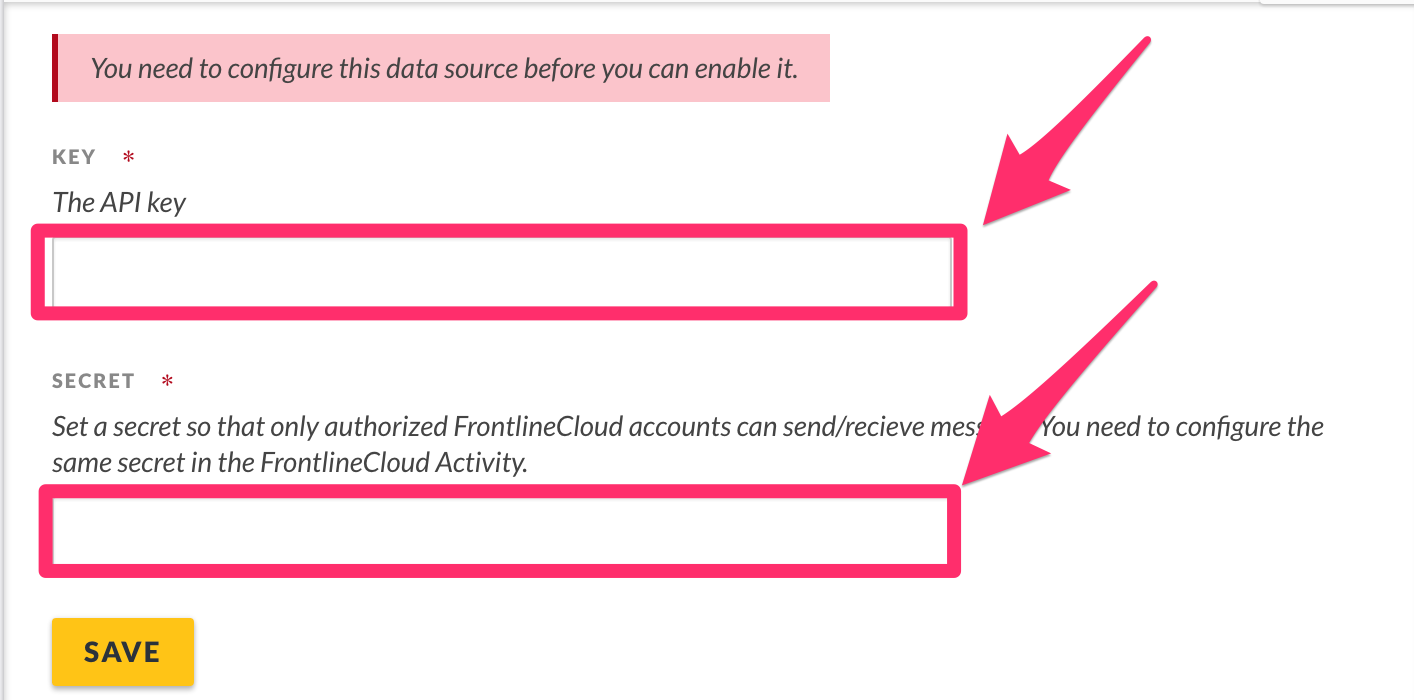
- Copy the Secret you just created you will need it for the final FrontlineCloud configuration and hit Save
- Return to your FrontLineCloud account
- Follow this guide:
- Connecting to another web service: creating a Forward to URL Activity
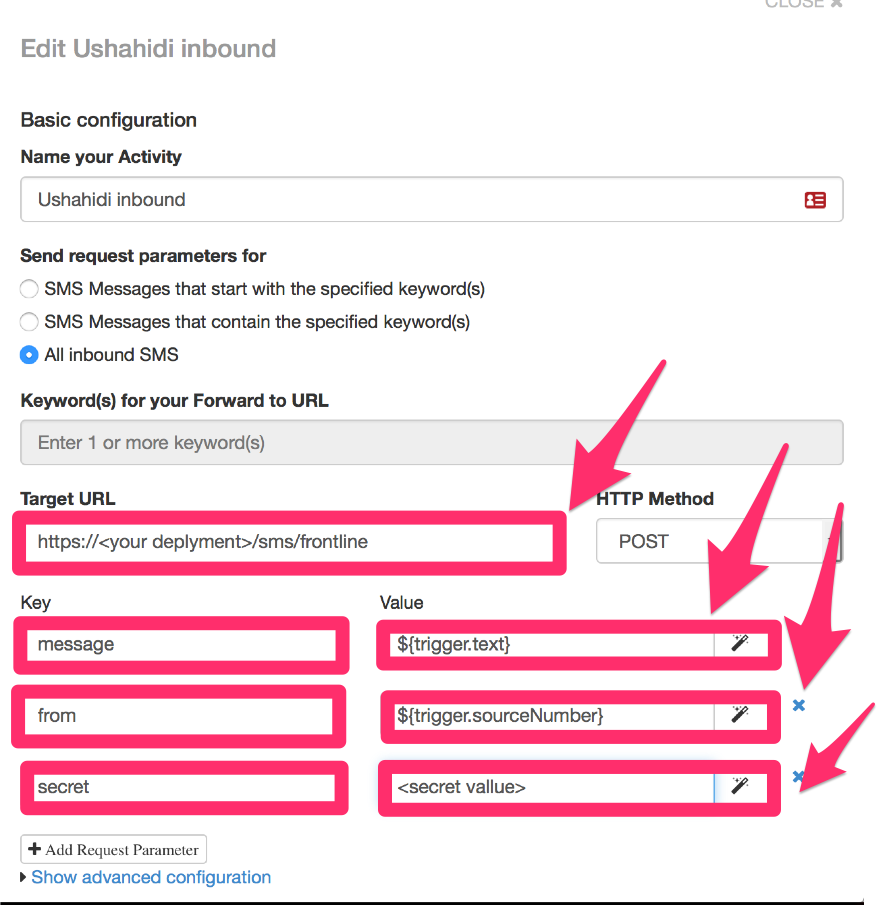
- For Step 2 part 4, you will need to set the url in the following form:
- https://<your deployment api url>/sms/frontlinesms
- Make sure to replace <your deployment api url> with the url of your deployment's api, if you are unsure of this contact the administrator of your deployment.
- For Step 2 part 6, you will need to define the following key, value pairs shown in the image below:
- key: message value: ${trigger.text}
- key: from value: ${trigger.sourceNumber}
- key: secret value: <secret value>
- This should be the secret value you created on the Ushahidi datasource step, replace <secret value> with the secret you copied earlier
- Finally, test that the system is setup correctly by sending a test sms to your number. The message should be forward to the Ushahidi deployment and appear on your deployment.
There are many ways to enter posts into your Ushahidi deployment other than from the deployment itself. This section shows you how to configure all the possible data source types. These include:-
NB: If you’re a user on ushahidi.com, the number of data source types available to you may be limited, based on the Ushahidi plan you are subscribed to. You may review these from our plans page. For open source/self hosted deployments, all data source types are available to you
To access the data sources configuration page,
- On the left hand menu bar, click on Settings
- Then, click on Data Sources.
You should get a full list of data sources as shown below
This section allows you to set up the platform to receive emails from user. Before getting started, make sure that you have an email account set up on Gmail, Yahoo or any other service provider. Make sure that you have IMAP/POP enabled (For more information on these two protocols, visit this website. Instructions on how to enable the IMAP/POP settings in your email can be found here
To get started with email set up,
- Click on the drop down icon on the right as shown
- Input the following email account settings:-
- Incoming server type: You have two options to select from, POP and IMAP. We recommend using IMAP if possible because it’s the best way to make sure you can see all your mail at any time on all of your devices
- Incoming server: Enter the address of the server where your email services are hosted. E.g mail.yourwebsite.com, imap.gmail.com or pop.gmail.com
- Incoming server port: Enter the port that your email account uses for incoming emails. This is also provided by your service provider and depends on the use of SSL(Secure Sockets Layer)/Transport Layer Security(TLS) or not. As a standard rule;
- IMAP uses port 143 , but SSL/TLS encrypted IMAP uses port 993 .
- POP uses port 110 , but SSL/TLS encrypted POP uses port 995
- Incoming server security: You have 3 options to choose from to enhance secure connection to your email mailbox, depending on which is supported by your email service provider.
- None
- TLS - Read more on Transport Layer Security
- SSL - Read more on Secure Sockets Layer
- Incoming user name: Enter the email address you want to use to receive emails e.g sample@youremail.com. We recommend setting up a separate email address for this purpose, preferably one that has lot of available space to avoid the account getting full in a short time, especially if the platform will be receiving a lot of submission via email.
- Incoming password: Enter the password of the email account inserted above.
- Outgoing server type: Select one of the three options presented to you:-
- SMTP: Simple Mail Transfer Protocol (SMTP) is recommended for use with the ushahidi platform.
- Sendmail
- Native
- Outgoing server: Enter the address of the server from which emails are sent out. This is also provided by the email service provider
- Outgoing server port: Enter the port your email service provider uses for outgoing emails. The default port tends to be 25, but SMTP with SSL support uses port 465 or 587
- Outgoing server security: Select one of the three options provided to you
- None
- SSL
- TLS, which is recommended by the service provider for outgoing server security.
- Outgoing user name: Enter the email address you want to use to send emails. E.g sample@youremail.com
- Outgoing password: Enter the password of the email account inserted above.
- Email sender name: This is what appears in the “from” field in outgoing emails.
- Click on Save and this data source’s settings will be saved. Unstructured posts from email will now be pulled into the platform.
- To enable/disable the email data source, simply click on the green toggle.
If you’d like to edit your email configuration, simply click on the drop down icon on the right while on the data sources list page and make your changes.
Nexmo is a cloud-based SMS API that lets you send and receive a high volume of messages to mobile phones in any country at wholesale rates.
NB: You need a nexmo account to be able to configure this as a data source. To sign up, go to https://dashboard.nexmo.com/si...
To get started with Nexmo set up,
- Log into your Nexmo Dashboard https://dashboard.nexmo.com
- If you haven’t already, you’ll need buy a number that you will use to receive SMS messages from.
- Click on Numbers on the top menu bar on your nexmo dashboard
- Click on Buy Numbers
- Set the desired criteria of the phone number you’re looking to use
- Select the country in which the SMS Number will likely be operating in
- Select the features of this phone number(SMS only, Voice only or SMS & Voice)
- Select the type of phone number it will be (Mobile, Landline, Toll free)
- Click on Search. A list of available numbers based on the criteria set above will appear.
- Click Buy on the number you’d like to use.
- Once you have a phone number, note it down as you’ll need it to configure your data source later on.
- You’ll need to grab your API credentials from your nexmo settings page.
- Pick your API KEY and API SECRET from the API Settings section.
- Go back to your Data source settings page on your deployment
- Click on the drop down icon on the right to get to your Nexmo configuration page
- Enter the following details, which you got earlier from your Nexmo Dashboard
- From: Enter the phone number you will use to receive SMS messages from your nexmo account
- Secret: Enter a secret value for security purposes.
- API KEY: Enter the API key retrieved from your nexmo settings page.
- API SECRET: Enter the API secret retrieved from your nexmo settings page.
- Click on Save and this data source’s settings will be saved. Unstructured posts from SMS will now be pulled into the platform from Nexmo.
- To enable/disable the nexmo data source, simply click on the green toggle.
If you’d like to edit your nexmo configuration, simply click on the drop down icon on the right while on the data sources list page and make your changes.
SMSsync is a simple, yet powerful SMS to HTTP sync utility that turns any Android phone into a local SMS gateway by sending incoming messages (SMS) to a configured URL (web service).
To get started with SMSSync set up,
- Click on the drop down icon on the right as shown
- Follow the instructions given to you below.
- Download the application from the Android Market by scanning the QR Code presented to you on the settings page or simply search for it in the android market.
Please note that SMSsync works on any SMS-enabled device running Android 2.1 and above.
- Retrieve the Sync URL, which you’ll need to configure SMSSync with under Step 2: ANDROID APP SETTINGS
- You can also set an SMSSync secret key for security purposes
- Click on Save
- Open up the SMSSync Application on your android device. You’ll note that you can manage multiple Sync URLs on the app.
- To add a new Sync URL
- Tap on the Sync URL from the navigation drawer.
- Tap on the Add icon icon on the actionbar. An input dialog should open.
- Enter a title for the Sync URL.
- Enter a secret key(If you set one above). Make sure you enter the exact key here.
- The secret key should be presented as string of any characters without spaces.
- Enter a comma separated value for the keyword(s). These keywords will be used by SMSsync to filter incoming SMS and pending messages to the Sync URL you are adding. As of v2.0.2. You can now add Regular Expression code for filtering. This means, it can either be CSV or RegExp. It cannot be both.
- Enter the URL for your web service. Don't forget to start with the HTTP or HTTPS protocol. e.g. https://example.com/api-v1/add-record/
- Tap OK to save the new entry.
Note: Version 2.5 or higher supports basic auth credentials in the URL, e.g. https://username:pass@example.com/api-v1/add-record/.
- You will now need to start the SMSSync Service to start forwarding messages to the platform. To start the SMSSync service
- Make sure that you have added and enabled(checked) the Sync URL you added above.
- On the SYNC URL screen, tap on the Start SMSsync service to start the service. You only do this if the service is disabled.
- You should be all set to work with SMSSync and Ushahidi now. Unstructured posts via SMS will now be pulled into the platform.
- To enable/disable the SMSSync data source, simply click on the green toggle.
- If you’d like to edit your SMSSync configuration, simply click on the drop down icon on the right while on the data sources list page and make your changes.
For more details on how to manage messages within SMSSync, see configuration instructions on the SMSSync Website
Twilio allows you to programmatically make and receive phone calls and send and receive text messages using its web service APIs.
NB: You need a Twilio account to be able to configure this as a data source. To sign up, go to https://www.twilio.com/try-twi...
To get started with Twilio set up,
- Log into your twilio account.
- You’ll need to buy a number to use. Click on PHONE NUMBERS.
- Click on Buy a number
- Select the desired criteria for your phone number
- Country
- Location/Number
- Capabilities (Voice, SMS, MMS)
- Click on Search. A list of available numbers based on the criteria set above will appear.
- Click Buy on the number you’d like to use.
- Once you have a phone number, note it down as you’ll need it to configure your data source later on.
- You’ll need to grab your API credentials from your Twilio Account settings page.
- Pick your ACCOUNT SID and AUTH TOKEN from the API Credentials section.
- Go back to your Data source settings page on your deployment
- Click on the drop down icon on the right as shown
- Enter the following details, which you got earlier from your Twilio Account
- From: Enter the phone number you will use to receive SMS messages from your twilio account
- ACCOUNT SID: Enter the unique ID of your twilio account
- AUTH TOKEN: Enter the Auth Token retrieved from your twilio settings page.
- SMS Auto Response: This will likely be the message sent back to users who send you SMS Messages.
- Click on Save and this data source’s settings will be saved. Unstructured posts from SMS will now be pulled into the platform from Twilio.
- To enable/disable the Twilio data source, simply click on the green toggle.
- If you’d like to edit your Twilio configuration, simply click on the drop down icon on the right while on the data sources list page and make your changes.
This section allows you to configure twitter as a data source, and subsequently pull unstructured posts from specific twitter hashtags.
For you to be able to pull tweets based on hashtags, you will need to set up your ushahidi deployment as an application on twitter. To get started,
- Click on the drop down icon on the right as shown
- Click on Create a new twitter application. This will redirect you to https://apps.twitter.com
- Sign into https://apps.twitter.com using your twitter username and password
- Click on “Create New App”
- Fill in the application details
- Name – this can be your deployment/site name e.g Uchaguzi
- Description – this is your deployment/site description – what your deployment does
- Website – this is your deployment url/link i.e http://yourdeployment
- Callback url – Leave this blank.
- Agree to the terms and conditions then click on Create your twitter application
- Once your application has been successfully created, you should now be able to access your access keys and tokens. To do so, click on Keys and Access Tokens or Manage Keys and Access
- You’ll get redirected to a page where you can grab details needed to configure your Ushahidi deployment i.e CONSUMER KEY, CONSUMER SECRET, ACCESS TOKEN, ACCESS TOKEN SECRET.
- You’ll have to generate an ACCESS TOKEN and ACCESS TOKEN SECRET by clicking on Generate my access token and token secret. This may take a couple of minutes, and your page will refresh with all the details you require.
- Go back to your twitter configuration page on your deployment and fill in all the details from your twitter app management page.
- Add the hashtags you want to pull tweets from in the “Twitter Search Terms” section. You can choose more than one hashtag, separated by a comma. It is recommended that short and clear hashtags be chosen.
- Click on Save and this data source’s settings will be saved. Unstructured posts from twitter will now get pulled into the platform.
- To enable/disable the twitter data source, simply click on the green toggle.
- If you’d like to edit your twitter configuration, simply click on the drop down icon on the right while on the data sources list page and make your changes.
FrontlineCloud is an online SMS management platform that lets you control and manage 2-way SMS engagement with anyone in the world.
NB: You need a FrontlineCloud Starter or Pro account to be able to configure this as a data source. To sign up, go to https://cloud.frontlinesms.com...
To get started with FrontlineCloud set up,
- Log into your FrontlineCloud account.
- You’ll need to setup your network connection
- Click on Connect to a Mobile Network
- Choose your mobile network
- Once you have setup your mobile network, click Activities
- Next you will need to setup An Activity to allow sending SMS from Ushahidi via Frontline, to do this follow this guide
- Send SMS from a Web Service Activity
- Copy the API KEY generated during this step, as you will need it in the next step
- Setup the FrontlineSMS data source on your Ushahidi platform
- Click on the drop down icon on the right as shown
- Enter the FrontlineCloud API KEY that you generated in the previous step in the The Api Key box
- Enter a secret code in the Secret box , this code will be used by
FrontlineCloud to connect to the Ushahidi deployment. You can enter any value you like here. It should ideally contain numbers and letters and be ~20 characters long.
- Copy the Secret you just created you will need it for the final FrontlineCloud configuration and hit Save
- Return to your FrontLineCloud account
- Follow this guide:
- Connecting to another web service: creating a Forward to URL Activity
- For Step 2 part 4, you will need to set the url in the following form:
- https://<your deployment api url>/sms/frontlinesms
- Make sure to replace <your deployment api url> with the url of your deployment's api, if you are unsure of this contact the administrator of your deployment.
- For Step 2 part 6, you will need to define the following key, value pairs shown in the image below:
- key: message value: ${trigger.text}
- key: from value: ${trigger.sourceNumber}
- key: secret value: <secret value>
- This should be the secret value you created on the Ushahidi datasource step, replace <secret value> with the secret you copied earlier
- Finally, test that the system is setup correctly by sending a test sms to your number. The message should be forward to the Ushahidi deployment and appear on your deployment.