If you’re someone who has used Ushahidi v2, Surveys (previously referred to as post types) in v3 are what we used to refer to as custom forms. A survey defines critical aspects of a post’s structure and permissions. For example, a post’s “survey” defines which fields are available for contributors to complete, and who can see it when it’s published.
This section will show you how to create and manage surveys on your deployment.
NB: If you’re a user on ushahidi.com, there are limits to the the number of surveys you can create, based on the Ushahidi plan you are subscribed to. You may review these from our plans page. For open source/self hosted deployments, you can create as many surveys as desired.
To access the Surveys configuration page,
On the left hand menu bar, click on Settings
Then, click on Surveys.
Building Surveys
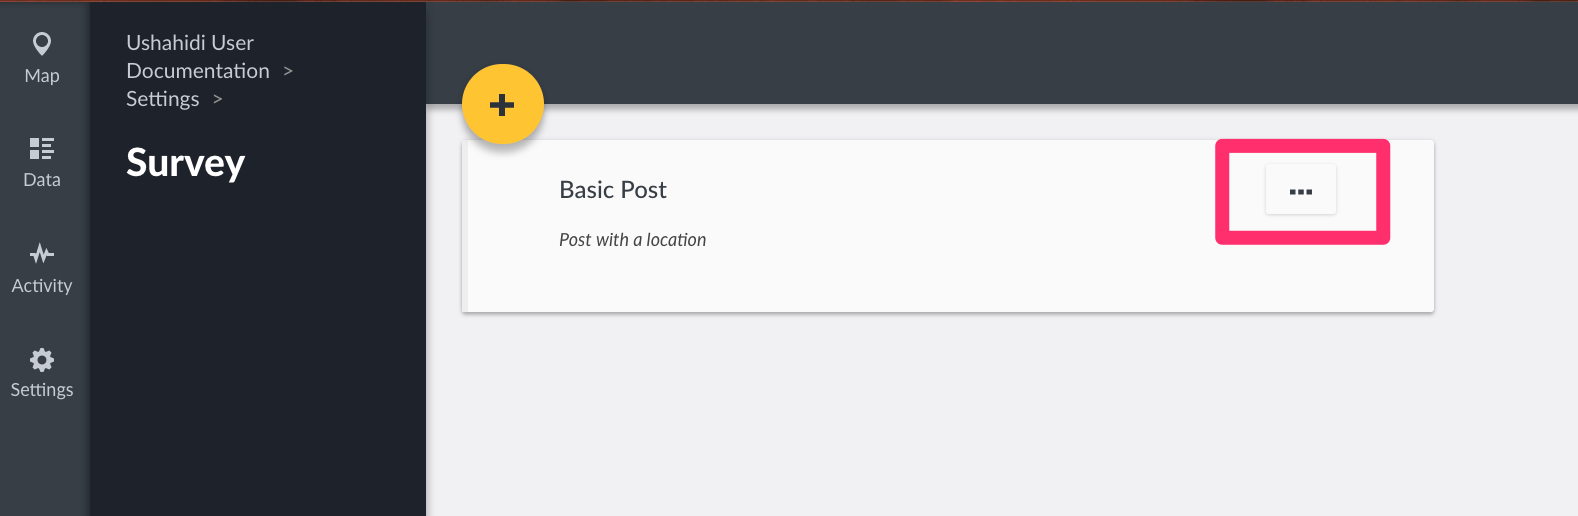
By default, each deployment has a Basic Post survey, which can be deleted or modified as needed. To create a new survey,
Click on the yellow icon as shown below
Fill in the required details.
Survey Name: Try being as specific as possible when creating your survey name so that users will understand what they are selecting when creating new posts
Description: Provide a brief description of what kind of data you’ll be collecting with this survey
Fields + Tasks: See below for details on how to add fields and tasks into your survey.
Click on save once you're done building your survey.
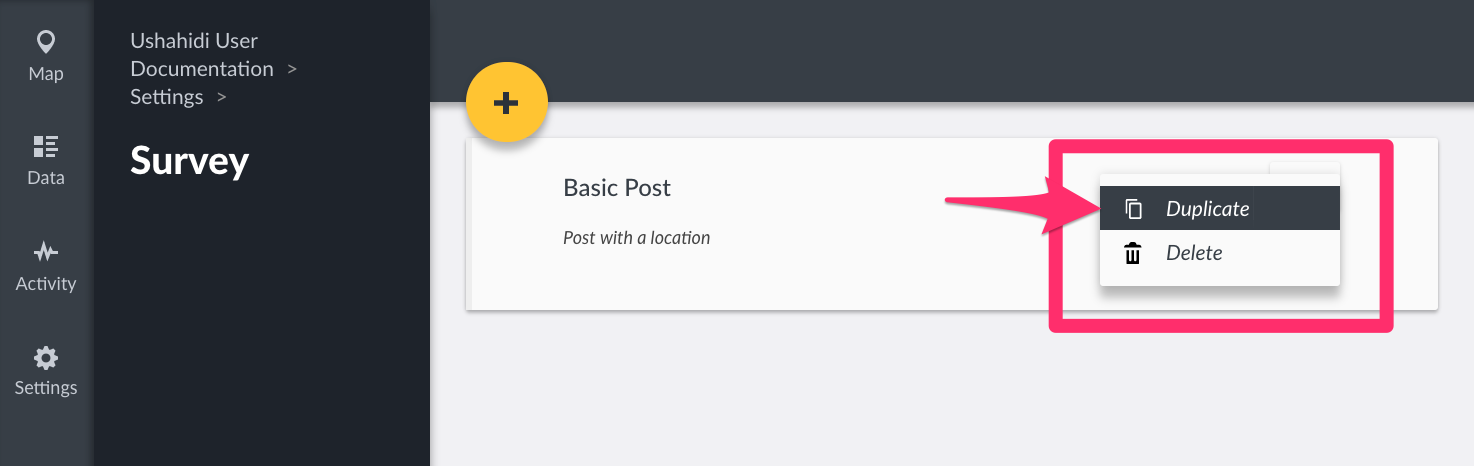
NB: If you're setting up multiple surveys with similar structures, here's a neat trick for you - you can duplicate your survey from the survey list page as follows :).
Fields
Each survey you create will have a title and description field by default. It's important to note these fields can be edited, but cannot be deleted.
Adding Fields
You can add as many custom fields to your survey as you see fit.To add a new field,
Click on Add Field
A pop up box with a list of different field types will appear on your screen. Choose whichever one will work best for the type of data you are trying to capture.
Add the following details
Name: This is what is displayed as a label for your newly created field
Show field description: You may add help text that provides additional details about this field.
Required: If set to yes, post submission will be only be successful once this field has been filled out.
Make responses private: This allows limiting access to responses to this field to specific users.
Default Value: You can set a default value displayed every time someone is creating a new post
Field Options: This appears in cases where you’re creating a checkbox, select or radio button field. You can add as many options as you would like
Once you’re done, click on Add&Close.
Editing Fields
To edit an existing field,
Select the desired custom field by clicking on it
Edit the fields(as described in the section above on Adding fields) as desired.
Click on Update&close when done.
You can also change the position of existing fields by clicking on the scroll icons to the left of every field as shown below.
Deleting Fields
To delete an existing field
Click on the trash icon adjacent to the field you'd like to delete
A pop up box will appear on the top of the page, prompting you to confirm whether you would like to delete the field
Click on Delete to delete the field
If you’d like to cancel the field deletion process, click on Cancel
Tasks
You can organize your survey into “Tasks”, allowing a deployment to add fields related to actions that need to be taken, like translation or verification. These groups of tasks are visible to specified users and can be marked as ‘complete.’ For example, if a particular survey requires verification upon submission, you can design a task to ensure your team knows the post needs to be verified before publishing. The task could include fields like whether the information was verified or not, who verified the information, how they verified it, and when they verified it. After verification, the task can be marked as complete and the post can either be moved to the next task if necessary, or published.
Building Tasks
To add a new task,
Click on Add Task on your survey creation/edit page
A small pop up box will appear, prompting you to give your task a name
If you’d like to make this task required before post submission, toggle the Require this task be completed before a post can be visible to the public button. This means that, a post will not be published until this task is marked as complete
Click on Add & Close
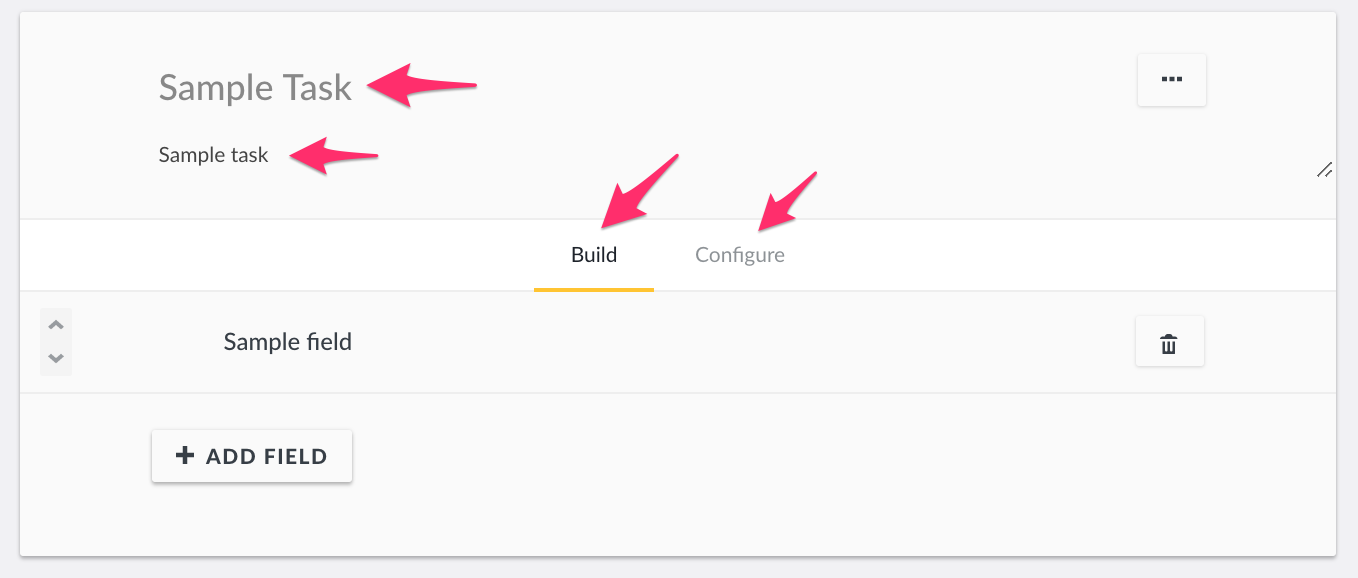
Once set up, you can duplicate your task as follows.
Adding task fields
You should be able to add fields to tasks in the same way that you add fields to a survey.
Please refer to the Fields section for details on how to add, edit and delete task fields.
Configuring tasks
To make additional configurations to your task,
Click on Configure
Set the following options
Required: When set to yes, this task must be set as complete for successful post submission
Task is only for internal use: This limits visibility of this task during submission only to teams with permissions to manage posts on your deployment i.e only internal team members will be able to submit responses to this task
Show this task to everyone when published: This limits visibility of task responses when viewing submitted posts if not enabled i.e it limits visibility of responses to tasks to internal teams only.
Editing Tasks
To edit an existing task,
Scroll down to the the desired task
Make changes as desired, e.g changing the task name, description, and/or making a task required or not
When done, click on Save on the top of the page
Deleting Tasks
To delete an existing task
Scroll down to the desired task
Click on the three dotted icon, and select Delete Task
A pop up box will appear on the top of the page, prompting you to confirm whether you would like to delete the task
Click on delete to delete the task
If you’d like to cancel the task deletion process, click on Cancel
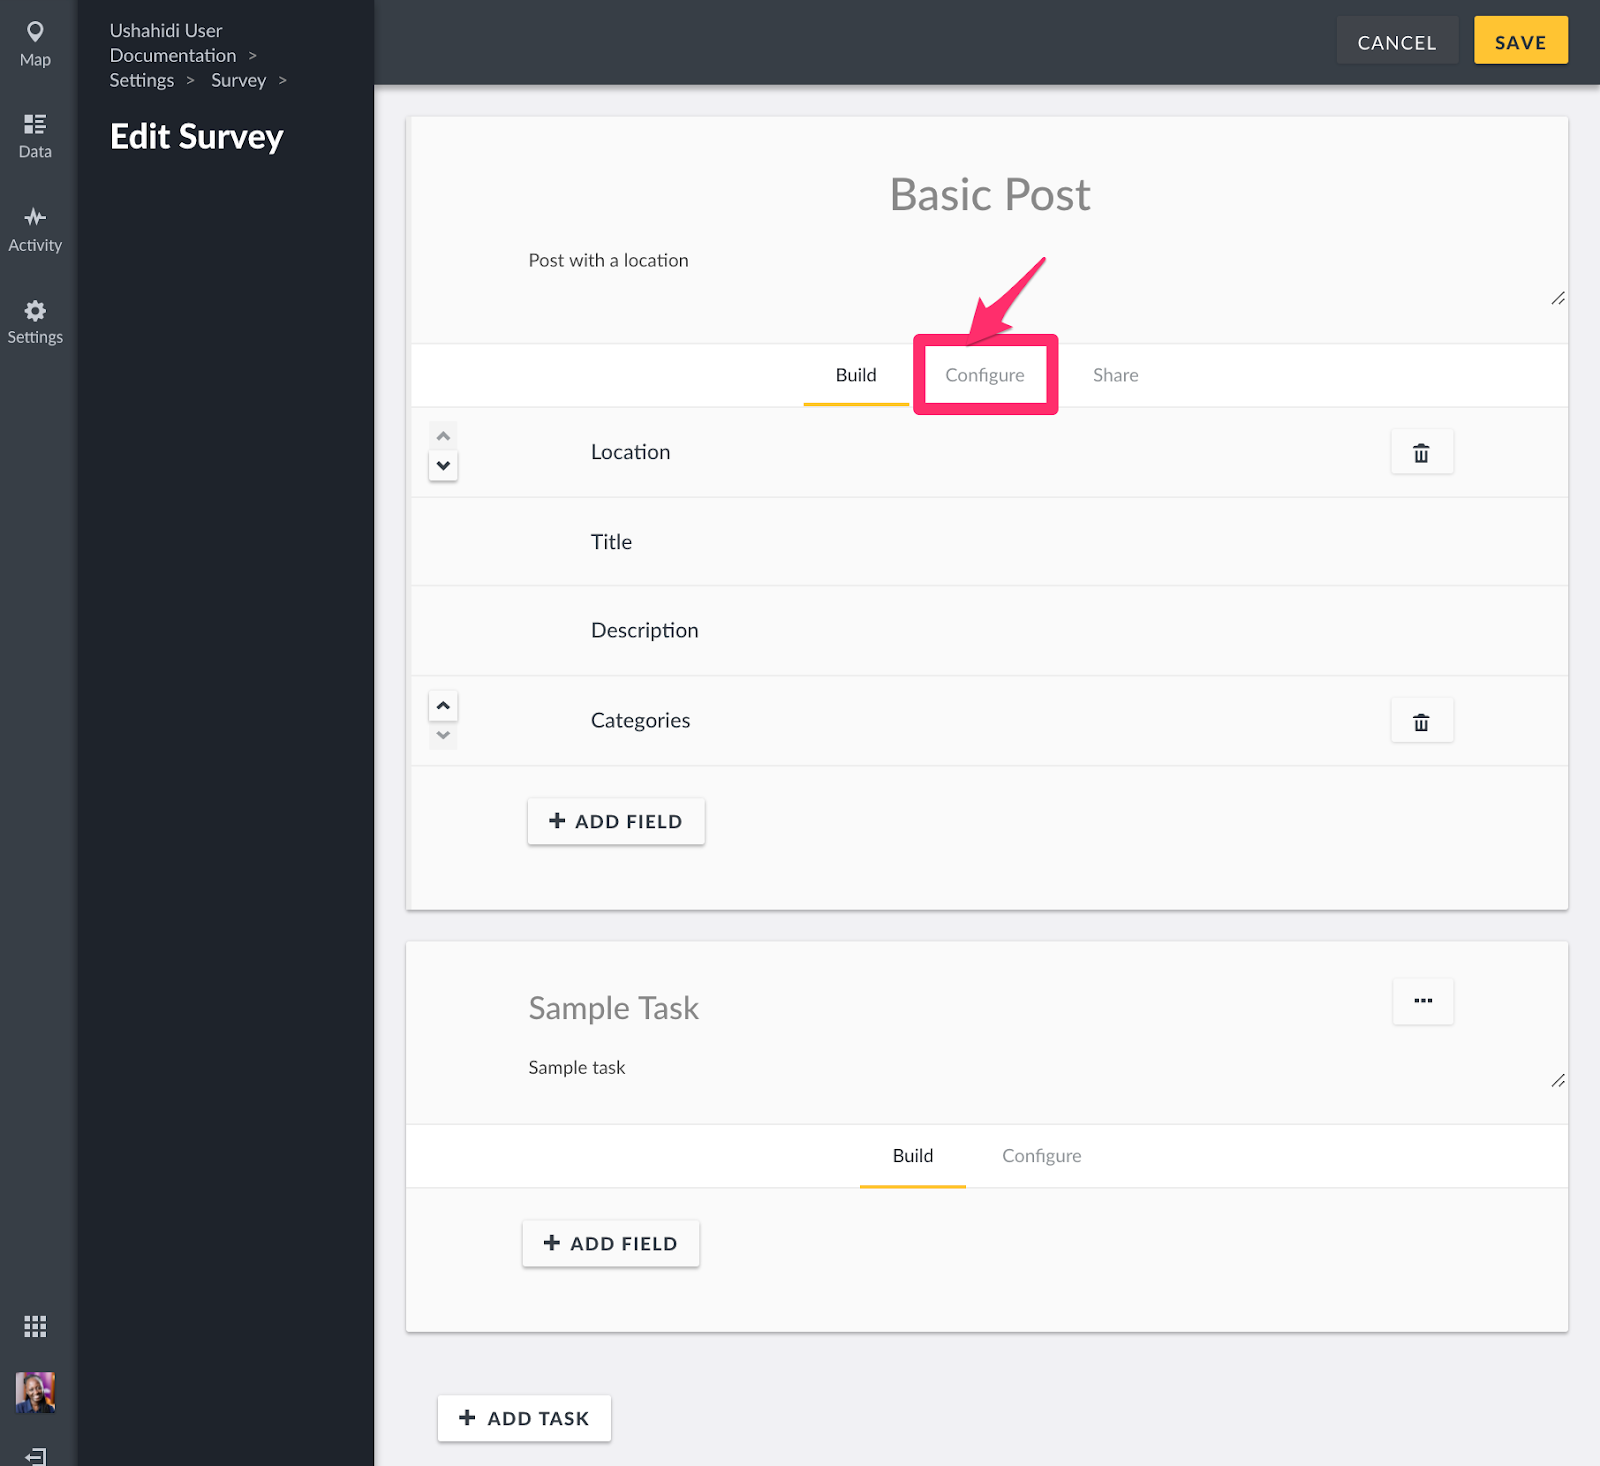
Configuring Surveys
You can make additional configurations to your survey e.g setting a survey color etc. To do so,
Click on Configure on the top of the survey editor
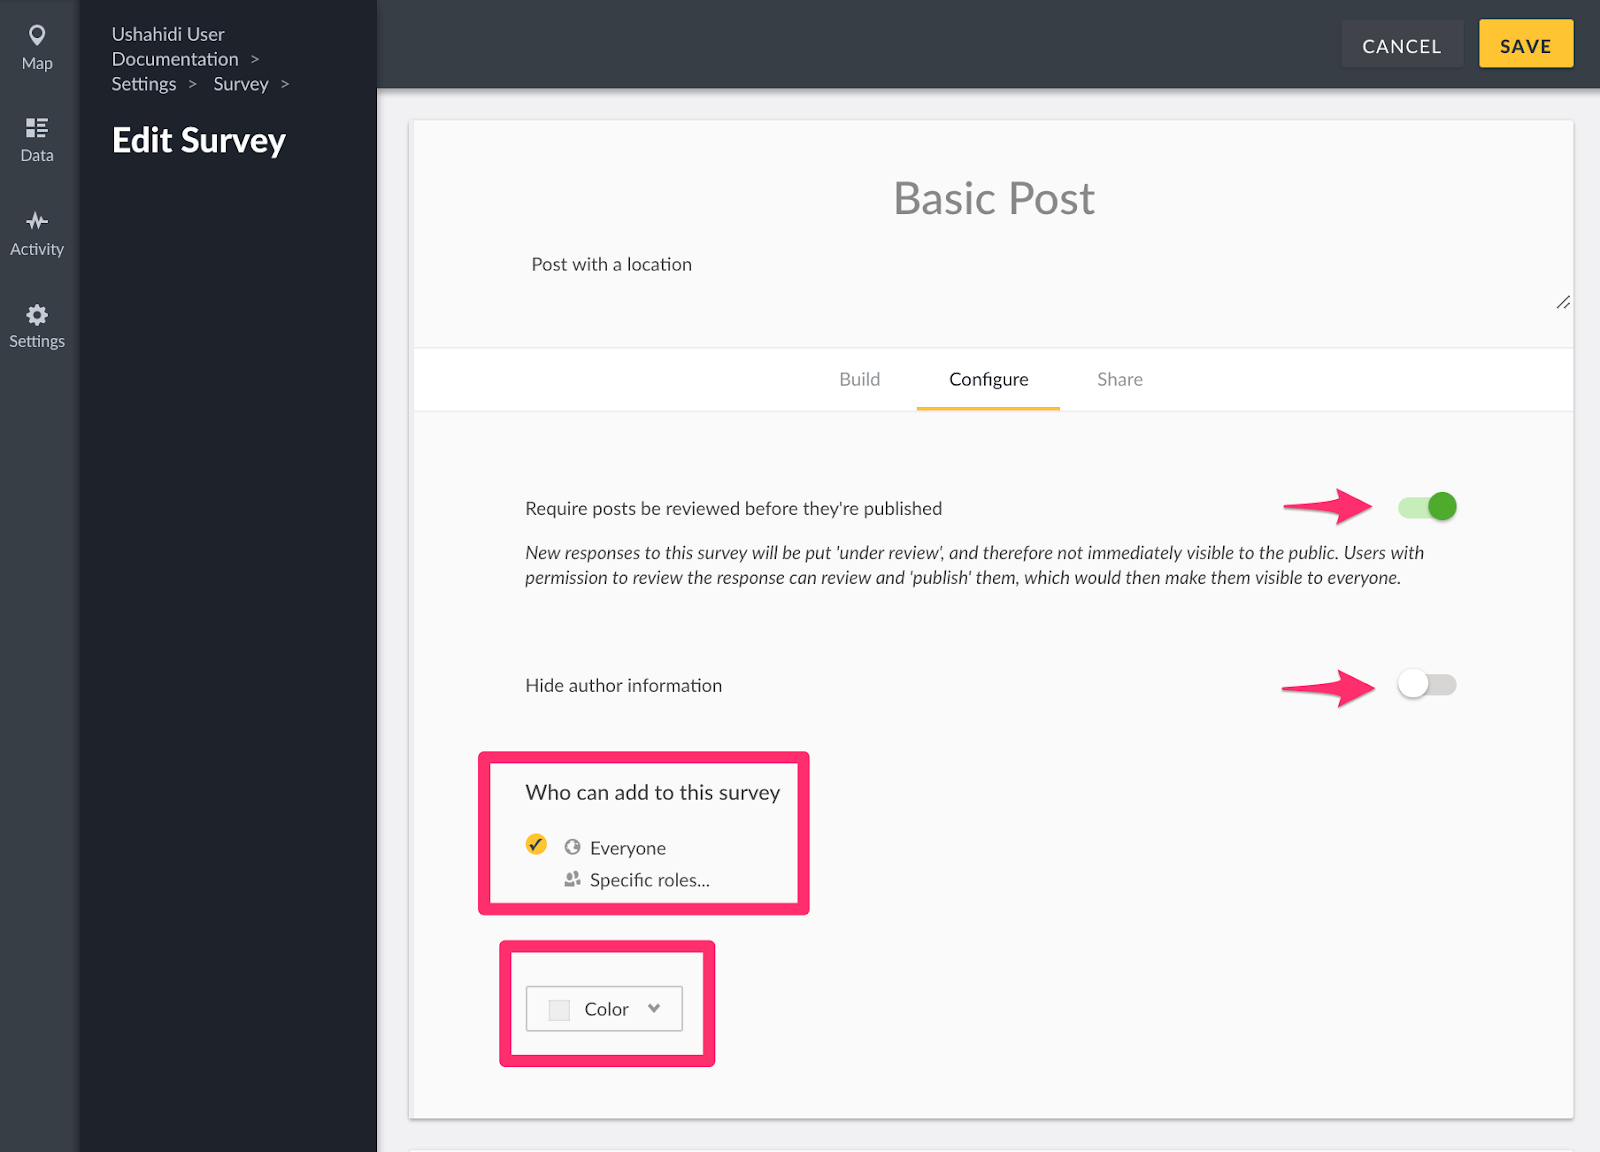
Configure the settings to suit your needs
Require posts be reviewed before they’re published: When toggled on, posts submitted on your deployment will not be made public i.e accessible to anyone beyond your internal team, until it is reviewed ( It will remain in draft). Setting this option off will automatically publish all posts submitted on your deployment.
Hide author information: When toggled on, this option hides author information e.g phone numbers, twitter handles and email addresses of people who submit posts to your deployment from the public. Note: logged in users with the permission to manage posts will still be able to see author information.
Who can add to this survey:You can limit submission of posts to your survey by roles. By default, surveys are open to the general public for submissions, and not limited to internal roles.
Color: Select a color or input a specific hex value to choose which color will be associated with this survey. Pins on the map will match whichever color you select.
Click on save once your configuration options are complete
Sharing Surveys
Ushahidi provides the ability to Share your survey across multiple platforms.
Web address: Copy and paste this link to direct people to your survey form
Facebook: Share the survey form on Facebook
Twitter: Share the survey form on Twitter
Embed: Copy and paste this HTML block of code to embed the survey form on any site across the web
Editing Surveys
To edit a survey
Click on a survey from the list of surveys on your page
From here, change your survey details as desired then click on Save
Deleting Surveys
To delete a survey,
Select the desired survey from the surveys list page, and click on the three dots icon adjacent to it. Then, select delete
A pop up box will appear on the top of the page, prompting you to confirm whether you would like to delete the survey
Click on Delete to delete the survey
If you’d like to cancel the survey deletion process, click on Cancel